
 Member
 baltolkien
Primera actualización de Plasma 6.7
Me alegra compartir con todos vosotros la primera actualización de Plasma 6.7, iniciando así una serie de revisión de software que le dotará de más estabilidad, mejores traducción y resolución de errores. Estas actualizaciones son 100% recomendables y casi obligatorias para cualquier usuario ya que lo único que hacen es mejorar la versión sin comprometer sus funcionalidades.
Primera actualización de Plasma 6.7
No existe Software creado por la humanidad que no contenga errores. Es un hecho incontestable y cuya única solución son las actualizaciones. Es por ello que en el ciclo de desarrollo del software creado por la Comunidad KDE se incluye siempre las fechas de las mismas siguiendo una especie de serie de Fibonacci.
Así que me congratula en presentar que hoy martes 23 de junio de 2026, una semana después de liberar el código de Plasma 6.7 la Comunidad KDE presenta la primera actualización de errores.

Más información: KDE
Las novedades generales de Plasma 6.7
Aprovecho para realizar un listado de las novedades generales de Plasma 6.7:
- Escritorios virtuales por pantalla: Ahora es posible configurar escritorios virtuales de forma independiente para cada monitor.
- Prueba del volumen del micrófono: Se ha añadido una herramienta para comprobar los niveles de entrada de audio, facilitando el diagnóstico de problemas con el micrófono.
- Caracteres especiales en teclado virtual: Al usar el teclado virtual, es posible mantener pulsada una tecla para acceder a los caracteres especiales asociados a ella.
- Interruptor rápido de temas: Se incluye un nuevo control para cambiar instantáneamente entre los temas globales claros y oscuros.
- Calendario lunar vietnamita: Se ha integrado este calendario en el sistema para permitir su uso junto al gregoriano.
- Mejora en «Aplicaciones en segundo plano»: La bandeja del sistema ahora muestra también las aplicaciones que utilizan el sistema de segundo plano moderno, frecuente en paquetes Flatpak.
- Monitorización de impresión: El icono de la bandeja del sistema para impresoras ahora muestra una placa indicando el número de trabajos activos.
- Gestión de colas de impresión: Se ha introducido una nueva herramienta para gestionar colas de impresión, diseñada tanto para un uso doméstico sencillo como para la gestión avanzada de múltiples impresoras.
-
Acceso rápido a escritorios en Vista general: Desde la Vista general (
Meta+W), ahora es posible cambiar entre escritorios virtuales usando el ratón o las teclasRePágyAvPág. - Favoritos por arrastrar y soltar: Se ha simplificado la gestión de favoritos en los lanzadores y menús de aplicaciones mediante la función de arrastrar y soltar.
La entrada Primera actualización de Plasma 6.7 se publicó primero en KDE Blog.
Flatpak.org Rewrite
The Flatpak website has been running on Middleman for years and time hasn't been kind. Touching the project resulted in seeing 42 vulnerability warnings. The gem itself hasn't seen an update in ages, and the dependency list is rather large.
Very recently, which happens to be 4 years ago, we've done a rebrand to reflect the fact that Flatpak has hit it big. There were a few hints of the old baggage, but overall it didn't feel like a website from 2007. But it was just lipstick.
For the layout, I reached for the same named-grid approach we designed for gnome.org. Instead of fighting with a rigid single column you get a multi-column grid with named areas. This allows you to escape the column to span across the whole width or do side-by-side layouts with overflow.
Most of the navigation is left to the footer. Another pattern we've embraced elsewhere and has worked well. A major simplification came from the great work of Kolja (razze) on Flathub -- all the distro setup instructions are maintained in one place.
Most benefits remain on the backend — keeping the site up to date won't be such a chore. Shoutout goes to Bart, AsciiWolf and Sebastian, thank you for caring. On to the next one!

Uyuni Joins openSUSE Project Ahead of Annual Conference
There are moments in open-source history that feel less like announcements and more like finally saying out loud what everyone already knew.
Eight years ago, during the annual openSUSE conference, the story began on news.opensuse.org with the announcement that Spacewalk was being forked. Today, as we gear up for the openSUSE Conference 2026, that circle is finally closing.
“It was a big moment when we decided to fork Spacewalk and move forward with Uyuni on our own,” said Johannes Hahn, who has been around the Uyuni project since the beginning. “Nowadays, we are still enthusiastic about maintaining the project and about further modernizing and improving it. In practice, we’ve been part of openSUSE for years; the infrastructure, the conferences and the people. Making it official just means everyone else now knows what we already did.”
Members of the project are delighted to share that the Uyuni Project has officially joined the openSUSE Project!
While the people have worked alongside each other since that initial fork, this formal integration marks a major milestone. It makes it easier for new contributors to find their way to Uyuni, gives the community a definitive home, and strengthens openSUSE’s tradition of bringing people together to build powerful, open-source tools that benefit the entire ecosystem.
A Partnership Years in the Making
To understand the significance of this homecoming, it helps to look back at the original fork.
By the mid-2010s, the original Spacewalk project (the foundation for Red Hat Satellite and SUSE Manager, which is now known as SUSE Multi-Linux Manager had reached a turning point. The upstream focus had shifted largely toward maintenance and stabilization. While the wider community remained highly engaged and continued submitting valuable code, many of those external contributions began to sit idle. When it was publicly announced that upstream code contributions would decrease and a call was made for other community members to step up and take over the management role, extensive discussions took place.
Ultimately, the community realized that a fork was necessary to inject new life and inspiration into the project. The goal was never just to maintain the status quo, but to build a collaborative space to innovate together-bringing in a modern React UI, container and Kubernetes integration, and utilizing Salt for configuration management.
To reflect this bold new direction, the project was named Uyuni, after the world’s largest salt flats in Bolivia. It was a nod to Salt, but more importantly, a massive statement of shared ambition.
Upstream First: A Community Without Second-Class Citizens
From the very beginning, Uyuni has been much more than just a codebase. It is a thriving, passionate community of system administrators, developers, and open-source enthusiasts dedicated to solving complex infrastructure challenges together.
While Uyuni serves as the upstream project for SUSE Multi-Linux Manager, its development thrives on a strict “upstream first” philosophy. Let’s be clear: Uyuni is not a stripped-down, feature-limited “free version” of an enterprise product. It is the fully-featured, cutting-edge foundation where every piece of innovation happens first. The project operates on the core principle that the community leads the way, ensuring that everyday contributors drive the project’s future. Everyone sits at the same table and there are no second-class citizens.
The heart of Uyuni is driven by the individuals who contribute code, squash bugs, translate documentation, and help answer each other’s questions in chat channels and forums. Over the years, this collaborative spirit has fostered strong relationships with developers across the open-source spectrum, sharing and receiving contributions with communities like Fedora, Alma Linux, and Rocky Linux.
As a configuration and infrastructure management tool, the code allows us to seamlessly deploy patches, manage configurations, and build containers. But it is the community that ensures the tool remains versatile; it supports a massive range of client systems including openSUSE flavors, SUSE Linux Enterprise Server, Red Hat Enterprise Linux (and its derivatives), Ubuntu, Debian, Amazon Linux, AlmaLinux and more.
Constant Innovation: Uyuni 2026.04
The community’s hard work continues to shine in the most recent release, Uyuni 2026.04. This update brings even more power to the platform by adding full support for RHEL 10 and compatible distributions. It also introduces enhanced security auditing integration and features a brand-new reporting dashboard for Grafana, built by and for the people who use it every day.
Celebrate Together at openSUSE Conference 2026!
Just like the original fork announcement at the 2018 event, this new milestone deserves to be celebrated in person, face-to-face with the people who make it all possible.
The openSUSE Conference 2026 runs from June 25-27 at the Z-Bau in Nuremberg, Germany. Attendance is completely free! People are encouraged to attend the live and virtual Uyuni community hours meeting during the event.
For more information and to register, visit events.opensuse.org. We can’t wait to see you there to celebrate the closing of this circle and the beginning of the Uyuni community’s official next chapter with openSUSE!
Episodio 74 de KDE Express: Plasma 6.7 the last of X11
Tras otro parón nada habitual de un mes me congratula presentaros el episodio 74 de KDE Express, titulado «Plasma 6.7 the last of X11» donde David Marzal no obsequia con el repaso de las últimas noticias del mundo KDE y del Software Libre en general.
Episodio 74 de KDE Express: Plasma 6.7 the last of X11
Comenté hace ya bastante tiempo que había nacido KDE Express, un audio con noticias y la actualidad de la Comunidad KDE y del Software Libre con un formato breve (menos de 30 minutos) que complementan los que ya generaba la Comunidad de KDE España, aunque ahora estamos tomándonos un tiempo de respiro por diversos motivos, con sus ya veteranos Vídeo-Podcast que todavía podéis encontrar en Archive.org, Youtube, Ivoox, Spotify y Apple Podcast.

De esta forma, a lo largo de estos 73 episodios, promovidos principalmente por David Marzal, nos han contado un poco de todo: noticias, proyectos, eventos, etc., convirtiéndose (al menos para mi) uno de los podcast favoritos que me suelo encontrar en mi reproductor audio.
En palabras de David:
Temas tratados en el episodio 74: Kdenlive, DigiKam, Haruna, AppGrid, Krita, SUSE, Quarkos, PrismLinux, Frameworks, Slackware, SteamOS, Plasma, Firefox
Artículo original con los enlaces en https://kdeexpress.gitlab.io/74/
Si no ves nada tras esta linea, es que tu app no sabe leer bien el feed RSS, avisales o prueba otra
- Apps
- Mejoras de Kdenlive en el último año:
- Borrado de fondo, gracias al plugin de segmentaciones de objetos.
- Reescrita la integración con OpenTimelineIO, con lo que los proyectos son compatibles con aplicaciones que soporten este formato.
- Mejoras de un 300% en el renderizado de las ondas de audio.
- Se rediseñó el Mezclador de audio
- Nueva Pantalla inicial que aparece al utilizar por primera vez el programa, así como una Pantalla de bienvenida que permite abrir fácilmente proyectos recientes.
- Nuevo sistema de empotrado más flexible que permite agrupar paneles, mostrarlos u ocultarlos según se desee y guardar organizaciones en forma de archivos independientes que es posible compartir o almacenar dentro de los proyectos.
- DigiKam 9.1
- Pixel Motion Photos, son videos cortos incrustados en imágenes tomadas en los teléfonos Google Pixel.
- Mejor soporte para la selección de salida de audio en el reproductor de medios de vídeo, lo que garantiza una experiencia de reproducción más fluida.
- Database and Metadata: Soporte a Zonas horarias
- Haruna 1.8.1
- Abrir varios archivos desde la línea de comandos, permite abrir solo los archivos seleccionados en el gestor de archivos
- Detener la acción, disponible en la reproducción
- Configuración para habilitar el progreso de la barra de tareas
- Mostrar nombre de archivo/título en OSD al abrir un archivo
- mpris: encontrar y configurar la cubierta de archivo de imagen externo para archivos de audio sin cubiertas internas
- Animación de carga personalizada
- Configuración para la propiedad de estilo sub-fronterizo de mpv
- AppGrid, este lanzador de aplicaciones para Plasma que no conocía ha publicado la versión 1.9
- Informe de abril de 2026 de Krita
- Distros
- Nate recomienda Kubuntu o Fedora KDE para novatos. Yo recomiendo Kubuntu o openSUSE SlowRoll
- 55.041.902 Lineas de Código la historia de KDE gracias a git.
- SUSE nos ayuda a securizar Plasma Login Manager
- Quedan 5 meses para la primera versión de Plasma Wayland-only
- Quarkos 26.04 Resolute LTS basada en Ubuntu 26.04 está disponible con KDE Plasma 6.6 por defecto. Y también tienen versión Trinity
- PrismLinux 2026.05.05 lanzado como modo Live-USB Plasma Wayland. Por si queréis probar una distro basada en Arch en modo live.
- KDE Frameworks 6.27.0 Me ha sloucionado un bug que tenia por montar unidades con systemd automount en vez de con auto.
- Slackware por fin recibe Plasma 6. En concreto la 6.6.5
- TDE o Trinity Desktop (Basado en KDE 3.5), KatanaDE (Basado en KDE 4.0) y SonicDE (Basado en Plasma 6 para X11): 3 interesantes escritorios basados en KDE disponibles en la Distro Vendefoul Wolf
- SteamOS 3.8 salta de Plasma 6.2.5 a 6.4.3 y ahora usa Wayland por defecto. Lo cual añade soporte a pantallas HDR, VRR y cambiar el factor de escala por monitor entre otras tantas cosas.
- KDE Plasma 6.7
- Escritorios virtuales por pantalla
- Mantener una tecla pulsada para seleccionar caracteres especiales
- Prueba del volumen del micrófono
- Cambiar entre los modos claro y oscuro en los plasmoides
- «Aplicaciones en segundo plano» en la Bandeja del sistema
- Cambio de escritorio virtual más rápido en la Vista general con Re y Av pag
- Arrastrar y soltar para añadir y eliminar favoritos
- Más facilidad para comparar diferentes zonas horarias
- Ya no es necesario elegir entre la gestión del color mediante un perfil ICC o disfrutar de contenido HDR: ¡ahora se pueden hacer ambas cosas a la vez!
- Mejora de las jaulas para Flatpak
- Quitar ventanas de la grabación mediante reglas
- La capacidad de duplicar conexiones de red, para que pueda crear rápidamente varias con solo pequeñas diferencias entre ellas (algo que puede ser útil en un entorno empresarial o escolar).
- Una opción para asignar atajos de teclado para activar o desactivar el modo global de silencio del micrófono «pulsar para hablar» y borrar el historial de notificaciones, lo que hace que estas acciones se activen más rápidamente.
- Restaurar sesiones Wayland
- Plasma Bigscreen
- MuyLinux
- FLOSS
- Firefox 151
- Copias de seguridad locales de tus perfiles
- Unir varios PDFs desde el navegador
- Nuevas opciones de privacidad.
- Control para desactivar la IA en Android
- Soporte para conexión de serie de HW, para conectar equipos como Adafruit

Por cierto, también podéis encontrarlos en Telegram: https://t.me/KDEexpress


La entrada Episodio 74 de KDE Express: Plasma 6.7 the last of X11 se publicó primero en KDE Blog.
3 novedades destacadas de Plasma 6.7
El pasado 16 de junio fue lanzado Plasma 6.7, una herramienta de productividad excepcional que da gusto usar (según nosotros), el cual ha llegado cargado de nuevas funcionalidades, así que es conveniente ir desglosándola poco a poco. Así pues, os invito a conocer 3 novedades destacadas de Plasma 6.7, algo muy subjetivo pero que el equipo de promoción considera que son las más importantes.
3 novedades destacadas de Plasma 6.7
Creo que es la primera vez que realizo este tipo de entradas pero es que en esta ocasión estas novedades destacadas me han parecido suficientemente significativas.
Escritorios virtuales por pantalla
Tras 21 años, confiemos en que la espera haya merecido la pena… ¡Por fin han llegado los escritorios virtuales por pantalla!
Esto significa que si tienes dos o más pantallas, y tiene dos o más escritorios virtuales, éstos son completamente independientes. Mira el vídeo inferior si quieres ver mejor el funcionamiento del mismo. Un buen avance.
Prueba del volumen del micrófono
Se acabaron los mensajes de que el audio está demasiado alto o bajo, o las dudas sobre si el problema es del micrófono o de alguna aplicación. Con esta funcionalidad ya puedes probar antes de iniciar una videoconferencia si tu equipo funciona como debe.
Selección de caracteres especiales manteniendo teclas pulsadas
Con el teclado virtual de Plasma activado, mantén pulsada una tecla para introducir caracteres especiales relacionados con ella. Algo muy habitual cuando ponemos contraseñas en la pantalla de identificación.
Evidentemente, son grandes novedades, aunque seguro que tú tienes alguna que te gusta más. Si es así, déjala en comentarios.
La entrada 3 novedades destacadas de Plasma 6.7 se publicó primero en KDE Blog.
Plasma 6.7 ya está aquí – Esta semana en Plasma
El incansable trabajo de promoción que está realizando Nate (ahora con ayuda de otros desarrolladores) en su blog sigue su ritmo. Cada semana hace un resumen de las novedades más destacadas, pero no en forma de telegrama, sino de artículo completo. Su cita semanal no falla y desde hace un tiempo que le voy a siguiendo semana tras semana, traduciendo sus artículos al castellano utilizando los magníficos traductores lo cual hará que la gente que no domine el inglés esté al día y que yo me entere bien de todo. Bienvenidos pues a «Plasma 6.7 ya está aquí» de «Esta semana en Plasma», toca cambiar el fondo del banner de la entrada. Espero que os guste.
Plasma 6.7 ya está aquí – Esta semana en Plasma
Nota: Artículo original en Blogs KDE. Traducción realizada utilizando Perplexity. Esta entrada está llena de novedades de la Comunidad KDE. Mis escasos comentarios sobre las mejoras entre corchetes.
¡Bienvenido a un nuevo número de This Week in Plasma!
Esta semana lanzamos Plasma 6.7, y hasta ahora las reseñas son abrumadoramente positivas.
Pero el equipo no se quedó de brazos cruzados; al contrario, pasamos la semana corrigiendo algunos problemas que se colaron entre nuestros beta testers o que los desarrolladores no lograron arreglar a tiempo para la versión final. Por ahora, parece que ha sido un lanzamiento bastante fluido.
Además, empezaron a integrarse funciones y mejoras de interfaz para Plasma 6.8. Échale un vistazo:
Nuevas mejoras
Plasma 6.8
Los monitores ahora se identifican con distintivos numéricos codificados por colores en todos los lugares donde se configuran, lo que facilita saber cuál es cuál, especialmente cuando se usan dos monitores de la misma gama de productos. (Ramil Nurmanov, kscreen MR #456 y kwin MR #9090) [Más claridad].

Frameworks 6.28
Los campos de búsqueda impulsados por KRunner ahora pueden convertir entre vatios-hora, kilovatios-hora y otras unidades de energía similares. (Levin Lhoest, kunitconversion MR #88) [Para lo que somos de ciencias nos va a venir muy bien].
Mejoras en la interfaz de usuario
Plasma 6.7.1
Ahora hay un efecto de transición suave al cambiar entre Temas globales, igual que ya ocurría al cambiar entre esquemas de color. (Kai Uwe Broulik, plasma-workspace MR #6199) [Parece una tontería pero le da un toque de saber qué está pasando].
Plasma 6.8
Se ha cambiado en todas las apps KDE basadas en QML el selector de color estilo KDE, en lugar del proporcionado por Qt, que no respeta los esquemas de color de KDE. Algunas apps ya lo tenían codificado a mano, pero ahora se aplica de forma universal, así que todas se benefician. (Tobias Fella, KDE Bugzilla #520987) [Ganamos coherencia].
Al mover una ventana arrastrándola mientras se mantiene pulsada la tecla Meta, ahora se coloca por delante de todas las demás ventanas. (Vlad Zahorodnii, KDE Bugzilla #520339)
Al intentar borrar un archivo del escritorio para el que no tienes permiso de eliminación, ahora al menos aparece un mensaje de error que explica cuál es el problema, en lugar de no hacer nada. (Tobias Fella, KDE Bugzilla #515869) [Eso está bien para que no parezca que no sabemos borrar].
Se hizo mucho más visible el botón “Conectar” en el diálogo de conexión VPN. (Kai Uwe Broulik, plasma-nm MR #600)
Se han añadido más símbolos a la función de “mantener pulsada una tecla para ver caracteres relacionados” del teclado virtual de Plasma. (Jonas Harer, plasma-keyboard MR #133)
Framework 6.28
Se corrigieron varias fuentes de iconos y miniaturas borrosas en todo el software KDE basado en Kirigami al usar un factor de escala fraccionario. (Marco Martin, kirigami MR #2116)
Se mejoró la forma en que los menús de Kicker, Kickoff, etc. manejan el caso de varias aplicaciones con el mismo nombre instaladas. (Christoph Wolk, KDE Bugzilla #516802)
Corrección de errores importantes
[No comento las correcciones de errores ya que son bastante evidentes].
Plasma 6.6.6
Se corrigió un problema que podía hacer que KWin no se iniciara al iniciar sesión con algunas GPU y controladores gráficos antiguos en ciertas circunstancias. (Xaver Hugl, KDE Bugzilla #521333)
Se corrigió un caso en el que Plasma podía bloquearse al cambiar fondos de pantalla en una presentación. (Fushan Wen, plasma-workspace MR #6753)
Se corrigió un problema en System Monitor que podía hacer que los elementos se ordenaran mal después de cambiar el orden o la visibilidad de las columnas en la tabla de datos. (Arjen Hiemstra, KDE Bugzilla #518073)
Se corrigió una regresión en el icono que muestra el widget de redes para las redes VLAN. (Fabian Druschke, KDE Bugzilla #516709)
Plasma 6.7.1
Se corrigió una de las formas más comunes en que Discover podía bloquearse en sistemas operativos que usan la tecnología de empaquetado rpm-ostree, como Fedora Kinoite. (Timothée Ravier, KDE Bugzilla #519672)
Se corrigió un caso en el que KWin podía bloquearse al iniciar sesión en el sistema si una app pedía un formato de color no válido. (Shaun Ren, kwin MR #9382)
Se corrigió un problema que podía romper la entrada de texto acentuado en algunos diseños de teclado mientras el teclado virtual de Plasma estaba activado. (Kristen McWilliam, KDE plasma-keyboard MR #126)
Se corrigió una regresión que hacía desaparecer algunos detalles de red del widget de redes. (Tobias Fella, KDE Bugzilla #521415)
Se corrigió una regresión que hacía que las insignias del Gestor de tareas con números muy grandes de elementos no leídos desbordaran visualmente en paneles muy estrechos. (Nate Graham, KDE Bugzilla #521562)
Se corrigió una regresión que hacía que el widget del lanzador de aplicaciones Kickoff se redimensionara de forma inapropiada al mostrar resultados de búsqueda justo después de añadirse a un panel. (Christoph Wolk, KDE Bugzilla #521383)
Se corrigió una regresión que hacía que el widget del lanzador de aplicaciones Kickoff perdiera su efecto de resaltado en los elementos de la lista de categorías, pero solo al usar el ajuste no predeterminado “Cambiar las categorías de la barra lateral al pasar el cursor sobre ellas”. (Christoph Wolk, KDE Bugzilla #521558)
Se corrigieron dos problemas con la sincronización del portapapeles en casos de escritorio remoto. (David Redondo, xdg-desktop-portal-kde MR #588 y xdg-desktop-portal-kde MR #589)
Frameworks 6.28
Se corrigió una regresión en Kirigami que hacía que la cabecera de la ventana “Gestionar paneles y escritorios” se superpusiera con el contenido. (Marco Martin, KDE Bugzilla #521552)
Destacado en rendimiento y aspectos técnicos
Plasma 6.6.6
Se corrigió una fuga de memoria importante que se обнаружrió al usar reglas de ventana para forzar las decoraciones de ventana en Firefox en modo CSD. (Xaver Hugl, KDE Bugzilla #518939)
Plasma 6.7.1
El complemento de entrada para mandos de juego se desactivó de forma predeterminada, ya que se detectaron algunos problemas y parece necesitar algo más de tiempo en el horno metafórico. (Xaver Hugl, kwin MR #9424)
Cómo puedes ayudar
KDE se ha vuelto importante en el mundo, y tu tiempo y contribuciones han ayudado a llegar hasta aquí. A medida que crecemos, necesitamos tu apoyo para mantener KDE sostenible.
¿Te gustaría ayudar a preparar este informe semanal? Preséntate en la sala de Matrix y únete al equipo.
Más allá de eso, puedes ayudar a KDE involucrándote directamente en cualquier otro proyecto. Donar tiempo es realmente más impactante que donar dinero. Cada colaborador marca una gran diferencia en KDE — ¡no eres un número ni un engranaje en una máquina! No tienes que ser programador, existen muchas otras oportunidades.
También puedes ayudar haciendo una donación. Esto ayuda a cubrir costes operativos, salarios, gastos de viaje para colaboradores y, en general, a mantener KDE llevando Software Libre al mundo.


La entrada Plasma 6.7 ya está aquí – Esta semana en Plasma se publicó primero en KDE Blog.
Publicado Agama 22
En esta versión 22 de Agama, el nuevo instalador de openSUSE/SUSE, las novedades se han centrado en pulir la interfaz de usuario, aunque también se ha trabajado en otras áreas.

El pasado 16 de junio se anunció la nueva versión de Agama. Veamos qué mejoras han incluido en Agama 22.
Rediseño de ciertas partes de la interfaz
En esta versión se ha rediseñado el aspecto de la cabecera del programa que presentaba diversos problemas y de la barra de herramientas para mejorar la herramienta a la hora de utilizarla.
El nuevo diseño muestra el nombre del producto y su logotipo en cada página, junto a un menú que detalla el apartado en el que estamos y que hace sencilla la navegación para regresar a otras secciones (a ese menú se le llama menú de migas de pan). El botón redundante y confuso de «Revisar e instalar» ha desaparecido y ese espacio ahora se usa para exponer las herramientas de instalación de una forma más ubicua.
Además de hacerse más visibles, las herramientas de instalación mencionadas también recibieron mejoras en la usabilidad. El monitor de progreso que antes solo se mostraba cuando algunas tareas estaban en curso ahora está siempre presente, lo que lo hace más comprensible.
La opción de descargar los registros de instalación ahora ofrece más información sobre su propósito y sobre el estado del proceso para recopilar y descargar los datos.
Apariencia configurable
Además de las herramientas mejoradas mencionadas disponibles en la barra de herramientas, ahora también encontrarás la nueva herramienta «Apariencia», que permite establecer el contraste y la combinación de colores de la interfaz de Agama. Que se adapta a los estándares lo que la hace más accesible para diferentes condiciones y gustos.
El nuevo esquema oscuro de Agama lleva los colores corporativos de SUSE, de manera predeterminada, pero ahora todos los productos pueden cambiar tanto los esquemas claros como oscuros de principio a fin personalizando un puñado de tokens. La personalización del modo de alto contraste está deliberadamente más restringida para asegurarse de que un cambio de imagen no pueda deshacer el trabajo de accesibilidad que PatternFly ha hecho para mantener ese modo conforme a WCAG AAA.
Y mucho más…
Pero además de estos cambios de estética y de usabilidad han propiciado que se hayan introducido mejoras por ejemplo en la configuración de los sistemas de archivos mejorando ciertas secciones, el ajuste de VLAN mediante la intrfaz web, junto con mejoras en la interfaz para la línea de comandos, porque no solo desde la interfaz gráfica se puede manejar Agama.
Mi escritorio Plasma de junio 2026 #viernesdeescritorio
Sigo con la iniciativa #viernesdeescritorio. Bienvenidos a mi escritorio Plasma de junio 2026, que en este mes cambio de dispositivo a mi Slimbook Pro, con el que llegamos a las 73 entregas compartiendo «Mi escritorio» de forma mensual, una edición especial ya que está sonbre Plasma 6.7 y muestro el tema global Oxygen.
Mi escritorio Plasma de junio 2026 #viernesdeescritorio
Esta va a ser la entrega número 73 en la que muestro mi escritorio Plasma 6 en público, lo cual es número nada desdeñable de entradas que sigue creciendo de forma constante.
Como decía en la introducción la realizo de nuevo sobre mi ultrabook Slimbook Pro, el cual tiene instalado un KDE Neon con Plasma 6.7, sobre una versión de KDE Frameworks 6.27.0 y una versión de Qt 6.11.1. El servidor gráfico es Wayland y el Kernel es 6.17.0-35-generic (64 bits).
En este equipo, como he dicho en la introducción, he decidido utilizar el tema global Oxygen (el cual hablé ayer) en su modo oscuro, y para el pack de iconos no podía ser otro que los que en teoría van con el tema, los clásicos Oxygen remozados, los cuales me retrotraen a un tiempo donde cada icono tenía muchos más detalles, lo cual a veces me gusta y a veces me satura.
La barra de tareas la tengo en la parte izquierda ocupando todo ese espacio y contiene de arriba a abajo.
- Reloj digital
- Selector de escritorios virtuales
- Gestor de tareas solo iconos
- Bandeja del sistema
- Vista de escritorio
- Lanzador de aplicaciones.
Además, el fondo contiene el reloj ClearClock por Advanced Modern Clear Clock, ya que este plasmoide coge bien la información del idioma de mi sistema, y por ello aparece el día de la semana en valenciano
El resultado de mi escritorio Plasma de juniio de 2026 es un entorno de trabajo oscuro y, como siempre, funcional que podéis ver en la imagen inferior (pinchad sobre ella para verlo un poco más grande).

La entrada Mi escritorio Plasma de junio 2026 #viernesdeescritorio se publicó primero en KDE Blog.
Planet News Roundup
This is a roundup of articles from the openSUSE community listed on planet.opensuse.org.
The community blog feed aggregator lists the featured highlights below from June 12 to 18.
Blogs this week cover the release of KDE Plasma 6.7 with per-screen virtual desktops and mic test features, KDE Frameworks 6.27, Agama 22 with redesigned UI and VLAN support, Amarok 3.3.3, syslog-ng 4.12.0, and a Tumbleweed weekly review delivering five snapshots. Also featured are GSoC first contributions, Thunderbird improvements, Symless joining KDE sponsorship, and more.
Here is a summary and links for each post:
The return of the Oxygen theme to Plasma
The KDE Blog goes over the release of Plasma 6.7 on June 16. The Oxygen theme from the KDE 4 era has returned as a full global theme for Plasma 6. What began as a restoration project drew a surprisingly large and positive response and attracted new contributors. Oxygen 6.7 arrives updated for full compatibility with current technologies.
Published Amarok 3.3.3
Victorhck shares an update on KDE’s music player Amarok and explains some of code quality improvements and fixes for compiling across different systems.
Preparing for GSoC: My First Contributions to Autogits
Mario Marín shares his initial contributions to the autogits repository as part of Google Summer of Code 2026. His work on obs-status-service included creating a mock Redis client for local development and testing without requiring a real Redis server, and designing a default service landing page where users can enter OBS project parameters to generate SVG status previews and Markdown snippets. The work reduces infrastructure requirements for new contributors.
If you use KDE in openSUSE16, you can not use RDP
The openSUSE Japanese user group reports that RDP (XRDP) does not work with KDE on openSUSE 16, which defaults to Wayland. The server fails with scp_process_msg failed errors, suggesting compatibility issues between XRDP and KDE on Wayland. Users needing RDP access on openSUSE 16 may need to choose GNOME instead. Meetings related to Leap 16 features and feedback can be found on calendar.opensuse.org.
Lanzado Amarok 3.3.3 «Beyond the clouds»
The KDE Blog celebrates the release of Amarok 3.3.3. The update restores system suspend inhibition during playback, fixes main window layout restoration after restart, resolves context applet height saving issues, prevents duplicate tracks when dragging from file manager to the playlist and more.
Thunderbird will make it easier to collaborate on its Android app
Victorhck reports on the Thunderbird team’s efforts to lower the contribution barrier for their Android and iOS email apps. The team is moving documentation, adding pull request templates including AI usage disclosure fields, and encouraging community involvement through testing pre-release builds, translating, and donating.
Things That Last
Jakub Steiner reflects on longevity and repair culture through a personal story about an annual bike trip to Jakuszyce, Poland. The post contrasts the disposable nature of household appliances with the enduring quality of a well-maintained bicycle that has remained a joy to ride for 15 years, serving as a meditation on what it means to make things last.
Lanzado Plasma 6.7, an exceptional productivity tool
The KDE Blog announces the release of KDE Plasma 6.7 on June 16. Key features include per-monitor independent virtual desktops, a microphone volume testing tool, virtual keyboard special character long-press input, a quick light/dark theme toggle, Vietnamese lunar calendar integration and much more.
syslog-ng 4.12.0, syslog-ng PE 8.2.0 and SSB 7.8.0 are now available
Peter Czánik announces coordinated releases across the syslog-ng product line driven by an SQL injection security fix. syslog-ng OSE 4.12.0 brings performance optimizations making the log processor more scalable, along with numerous user-reported bug fixes.
Releasing version 22
The Agama Installer team announces Agama 22 with a redesigned header and toolbar that improves navigation with persistent product logos, breadcrumbs, and relocated installer tools. New features include configurable appearance with dark and light themes, advanced filesystem configuration options in the disk setup UI, VLAN connection support through the web interface and more. A new access section in JSON configuration simplifies setting up SSH or Cockpit on the installed system.
Windows-style launcher with Tiled Menu Prime – Plasmoids for Plasma 6 (32)
The KDE Blog presents Tiled Menu Prime, the 32nd entry in the Plasma 6 plasmoid series. The Windows 10-style start menu replacement supports pinned applications, resizable tiles in multiple sizes (1x1, 2x2, 4x4, and more), customizable sidebar shortcuts, and letter-jump navigation. It is based on the work of Zren’s original Tiled Menu plasmoid.
Add a keyword so Thunderbird reminds us if we want to add an attachment
Victorhck shares a practical tip for Thunderbird users with customizing attachment reminder keywords. By navigating to Settings → Composition → Attachments, users can add new trigger words like “attached” to ensure Thunderbird prompts them before sending an email without an intended file.
Improvements to stay in the loop
The OBS blog presents two small improvements aimed at helping users stay on top of their workflow. Notification filters are now preserved when returning to the notifications list, so users sifting through large volumes of notifications no longer lose their narrowed-down view. Additionally, global role changes now trigger notifications: users are alerted when one of their global roles is assigned or revoked, and other members of the affected role are notified of the change as well.
Symless is also a KDE sponsor
The KDE Blog announces that Symless, the company behind the Synergy software for sharing a single keyboard and mouse across multiple computers, has joined the KDE sponsorship program. The sponsorship supports KDE’s ongoing development and community initiatives.
Introducing pkgcli: A nicer command-line interface for PackageKit
Matthias Klumpp introduces pkgcli, a new command-line client for PackageKit built to replace the long-stagnant pkcon tool. Developed as part of his work as a fellow for the Sovereign Tech Agency, pkgcli aims to be pleasant for interactive use and easy to script.
Linux Saloon 207 | LibreWolf Web Browser
Nathan Wolf recaps a Linux Saloon episode that opens with Mike (FullScale4me) discussing older computer systems and “Big Iron.” The panel shares thoughts on LibreWolf, concluding it suits privacy-focused users who prioritize security but may not be ideal for casual users. The conversation about privacy gets passionate, and a little spicy.
Linux Saloon 206 | Early Edition
Nathan Wolf previews a Saturday tech-focused session covering open source, gaming, and Linux. Key topics include the compromise of Arch Linux AUR packages and deprecated Linux commands.
Plasma 6.7 is very close – This Week in Plasma
The KDE Blog translates the “This Week in Plasma” report released ahead of the Plasma 6.7 launch. The preview highlights per-screen virtual desktops, a microphone volume test tool, virtual keyboard special character input by long-press, a quick theme switcher between light and dark modes and more.
Twenty-seventh update of KDE Frameworks 6 and KCalendarCore library
The KDE Blog announces the 27th update of KDE Frameworks 6, which arrived in Tumbleweed on June 16. The release spans all major framework modules with bug fixes across KIO, KConfig, KTextEditor, and Kirigami. The post also profiles the KCalendarCore library, which powers calendar functionality across KDE applications.
Tumbleweed – Review of the Week 2026/24
Victorhck and Dominique Leuenberger report on a productive week with five Tumbleweed snapshots (0604, 0605, 0608, 0609, 0610). Key updates included Linux kernel 7.0.11, Mesa 26.1.2, fontconfig 2.18.0/2.18.1, harfbuzz 14.2.1, PHP 8.5.7, KDE Gear 26.04.2, Mozilla Firefox 151.0.3 & 151.0.4, sqlite 3.53.2, systemd 260.2, and file 5.48. Staging highlights include MariaDB 12.3.2, KDE Frameworks 6.27, Linux kernel 7.0.12, KDE Plasma 6.7.0, Poppler 26.06.0, QEMU 11.0.0 dropping 32-bit host support, and GCC 16 as the system default compiler.
View more blogs or learn to publish your own on planet.opensuse.org.

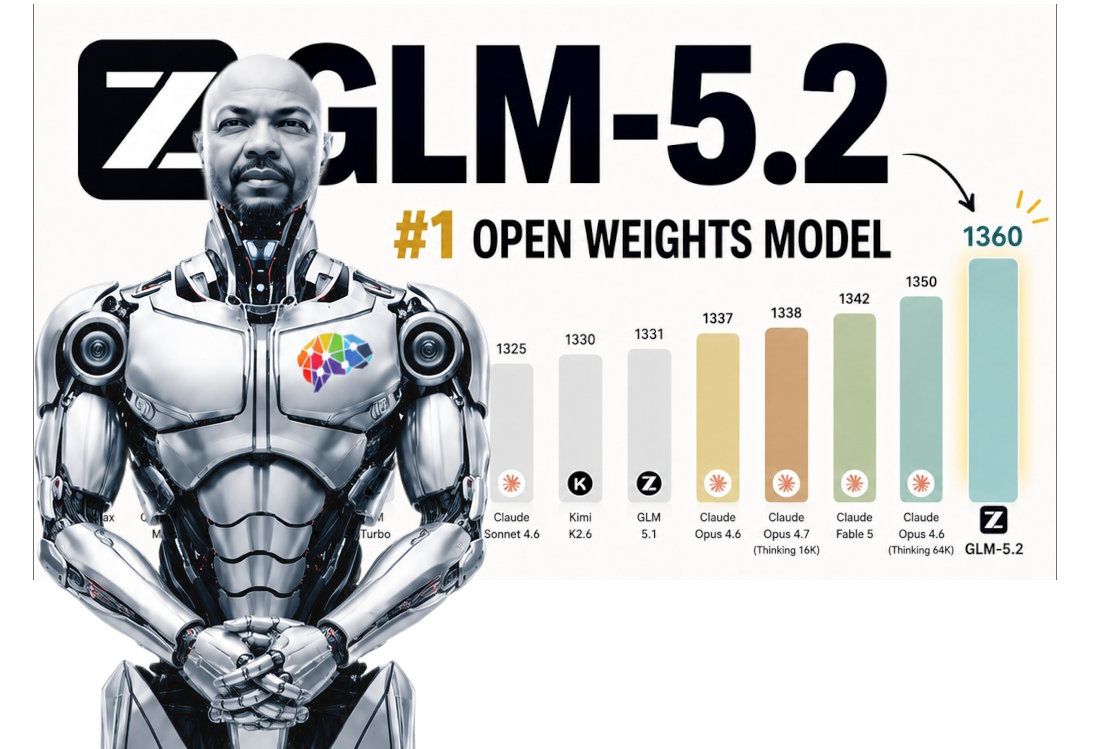
O GLM 5.2 : O Novo modelo que Está Desafiando a OpenAI e a Anthropic.
Eesta semana, a comunidade de Inteligência Artificial recebeu uma surpresa fantástica: a empresa Z.A ai lançou oficialmente os pesos abertos (open weights) do seu novo modelo, o GLM 5.2. O lançamento incluiu tanto a versão completa quanto a versão FP8 do modelo. Essa é uma mudança de postura muito bem-vinda, já que, recentemente, diversos criadores de modelos chineses estavam hesitando em liberar os pesos, optando por oferecer apenas versões proprietárias por meio de APIs.
Com base em testes rigorosos e novos benchmarks, o GLM 5.2 não é apenas uma pequena atualização, mas sim uma ferramenta incrivelmente poderosa. Aqui estão os detalhes que você precisa saber sobre o porquê de este modelo estar chamando tanta atenção.
Desempenho de Ponta e Salto em Relação ao GLM 5.1 A evolução da versão 5.1 para a 5.2 é descrita como “enorme”, particularmente em tarefas complexas como programação e uso de agentes autônomos (agentic coding). O GLM 5.2 foi construído especificamente para tarefas de longo horizonte (“long horizon tasks”) e tem mostrado resultados esmagadores nos benchmarks da Artificial Analysis.
Para se ter uma ideia do seu poder, ele está superando modelos de peso como Deep Seek Pro, Quen 3.7 Max, Miniax M3 e até modelos proprietários fechados como o GPT 5.5. Nos rankings atuais de inteligência, o GLM 5.2 tem sido batido apenas pelo Opus 4.8 da Anthropic e pelo modelo Fable (que, vale ressaltar, não está mais disponível para a maioria do público e apresentava falhas sem o uso do Opus 4.8 como fallback). Além disso, o GLM 5.2 está se destacando no novo benchmark Deep Suite, que vem substituindo métricas mais antigas da indústria.
O Segredo: Longas Cadeias de Pensamento e Predição de Múltiplos Tokens O que faz o GLM 5.2 ser tão inteligente? Em grande parte, é a sua arquitetura voltada para longas cadeias de pensamento (long chains of thought). Enquanto laboratórios como OpenAI e Anthropic têm focado em obter alta inteligência com uma quantidade menor de tokens de saída, o GLM 5.2 vai na direção oposta: ele utiliza uma grande quantidade de tokens de raciocínio para refletir profundamente antes de responder. Ao lidar com quebra-cabeças de lógica, por exemplo, o modelo aumenta significativamente a quantidade de tokens de pensamento da maneira correta, demonstrando um verdadeiro raciocínio.
Apesar de gerar muitos tokens, o modelo não é lento. Graças à adoção da tecnologia de predição de múltiplos tokens (multi-token prediction), o GLM 5.2 se tornou muito mais rápido que seus antecessores. Em testes práticos utilizando a API do Open Router, a velocidade média de geração tem ficado entre 36 a 40 tokens por segundo.
Na prática, o modelo é capaz de entregar resultados onde muitos outros falham:
- Design de Interfaces (Front-End): O GLM 5.2 assumiu o primeiro lugar na “Design Arena”, superando até mesmo a família de modelos Claude
Em um teste solicitando a criação de uma página web complexa, o modelo gerou perfeitamente um site estilo Anthropic com mais de 8.000 tokens, contendo imagens embutidas e diversas animações interativas.Geração de Textos Extensos: Se você precisa de redações longas, o GLM 5.2 brilha. Enquanto modelos tradicionais frequentemente interrompem a geração ao redor de 500 palavras, o GLM 5.2 possui a capacidade de continuar escrevendo até superar a marca de 5.000 tokens gerados em uma única resposta.Capacidade Visual/Lógica (SVG): O modelo passou tranquilamente no teste de criar visualmente um “Pelicano andando de bicicleta” usando apenas código SVG.
Custo-Benefício Imbatível e Controle de Privacidade A abertura dos pesos do modelo também resolve uma preocupação crítica corporativa: privacidade de dados. Como o modelo é de código aberto (open weights), várias empresas (como a Together AI no futuro) poderão hospedá-lo. Isso significa que os desenvolvedores não são obrigados a enviar seus dados proprietários para data centers na China, podendo escolher provedores locais de sua confiança.
No quesito preço, o GLM 5.2 chega para quebrar o mercado. Ele está sendo disponibilizado por cerca de US 4,40 por milhão de tokens de saída. Esse valor é dramaticamente inferior aos planos pagos e aos custos de API dos modelos proprietários equivalentes no mercado atual.
Veredito: Vale a Pena? Com toda certeza. O GLM 5.2 surge como um substituto formidável e infinitamente mais barato para modelos comerciais que usamos rotineiramente, como o Gemini Flash.
Dica de Segurança: Se você for experimentar o modelo agora utilizando agregadores como o Open Router, certifique-se de verificar as políticas de privacidade da plataforma em relação à retenção dos seus prompts e dados para treinamento de outros modelos de terceiros. O GLM 5.2 já está provando que modelos abertos chegaram para competir de igual para igual e possivelmente ultrapassar os gigantes da indústria.
Até a próxima.