
 Member
 kkaempf
D-Bus service on demand
Here is the last part of my mini-series about D-Bus, this time on D-Bus activation
In my last blog entry I talked about implementing a D-Bus service in Ruby. Running the service was done as a background daemon, started by root (or with other credentials).
D-Bus also provides an on-demand service creation, named activation. Here the D-Bus daemon creates the service as soon as a client is requesting it. Shutdown of the service is at the discretion of the implementation, the D-Bus deamon does not automatically deactivate a running service.
About D-Bus activation
For D-Bus actication, you have to create a .service file. This is an INI-style format file containing
- the name of the service
- the file to run, implementing the service
- the user name to run the service as
Since the D-Bus daemon runs as user 'messagebus' and thus is unprivileged. It cannot directly run the service or assume the correct user credentials.
Instead, it uses a service helper which is setuid root to start the service. This helper is configured within /etc/dbus-1/system.conf as <servicehelper> and typically resides below /lib/dbus-1/dbus-daemon-launch-helper (/lib64/dbus-1/dbus-daemon-launch-helper on 64bit systems).
dbus-daemon-launch-helper is extra-picky when it comes to security and checks its own configuration at startup. If your D-Bus service fails to get activated, maybe dbus-daemon-launch-helper is not correctly installed.
Writing the .service file
The name of the service file must be equal to the service name with a .service extension.
A typical service file for my.awesome.Service would be named my.awesome.Service.service and contain
# DBus service activation config
[D-BUS Service]
Name=my.awesome.Service
Exec=/usr/bin/awesome
User=the_dude
Name is the name of the service, Exec the path to the executable implementing the service and User the user name to run the service. Be careful when using User=root, only very few services actually need root rights.
The Exec line can also contain arguments to be passed to the executable. This can be used to e.g. implement multiple services in a single binary and pass the actual service name as a parameter.
Installing the .service file
Just copy the service file to either /usr/share/dbus-1/system-services (for a system bus service) or to /usr/share/dbus-1/services (for a session bus service).
Your service is now ready to run. The D-Bus daemon will automatically pick up changes in the service directories and find the new file.
Trainee small project
Hi all!
Well , beginning from this week i will start to work on one small project (one week).
Probably it would be a YaST or QT application, so if you had a really good idea, give me simple feedback. 
Club Koma
I also bought some new / old cameras from ebay, a Kodak DC 240, Kodak DC 210, HP Photosmart C200 and (from the NORMA supermarket around the corner) a Disney Micropix. All below 20 Euro, and I even had to fix the DC240 driver to make it work.
Nothing much interesting to speak about at work, except I am writing an OVAL description emitter for our updates. Long planned, still not done.
Easy live upgrade from 11.0 to 11.1
Today I tried a new way to do a live upgrade with one of my machines from 11.0 to 11.1. In the end, it takes nearly 1 day, because I had to download nearly 3,2 GB software (puh!) – but for me it was just a 3 minute work 
It turns out that the most problematic part was the new RPM-“Distribution” string for openSUSE since 11.1. As openSUSE is now completely build in the openSUSE Build Service, the Distribution string of each package switched from “SUSE LINUX Products GmbH” to “openSUSE 11.1” – and zypper complains about this vendor switch during a live upgrade.
My Solution: Just create a new file “/etc/zypp/vendors.d/openSUSE” as root and insert the following content:
[main]
vendors=openSUSE,SUSE LINUX Products GmbH
Now, zypper identifies packages from Vendor “openSUSE” as the same as packages from vendor “SUSE LINUX…”
Whats left is the adaption of the repositories (they should point to 11.1 now):
localhost:~ # cd /etc/zypp/repos.d/
localhost:~ # sed -i “s|11.0|11.1|g” *
…and right afterwards, the show can go on…
localhost:~ # zypper ref
Retrieving repository ‘OBS-Edu’ metadata [done]
Retrieving repository ‘Packman Repository’ metadata [done]
…
localhost:~ # zypper dup
Loading repository data…
Reading installed packages…
Computing distribution upgrade…
The following packages are going to be upgraded:
…
Press “y” and Enter – and go to bed or something else – next day, reboot your machine and welcome your new 11.1!
New KDE Four Live-CDs
KDE Project:
New KDE Four Live CDs with KDE 4.2.1, KOffice 2.0 Beta 7 and much more are up.
They were built within openSUSE Build Service's KDE:Medias project in which also automatically Live-CDs with KDE trunk snapshot packages (currently 4.2.65) from KDE:KDE4:UNSTABLE repositories are built. The ISOs appear (without prior testing by anyone) here.
Context Menus in YaST Partitioner
We received some complains that the redesigned partitioner on openSUSE 11.1 is
tedious to use. To remedy these shortcomings I’m adding context menus to the
tables so that it is no longer required to select the correct view using the
navigation tree to perform some operation. Almost all operation should be
available via context menus in the main view listing all devices.
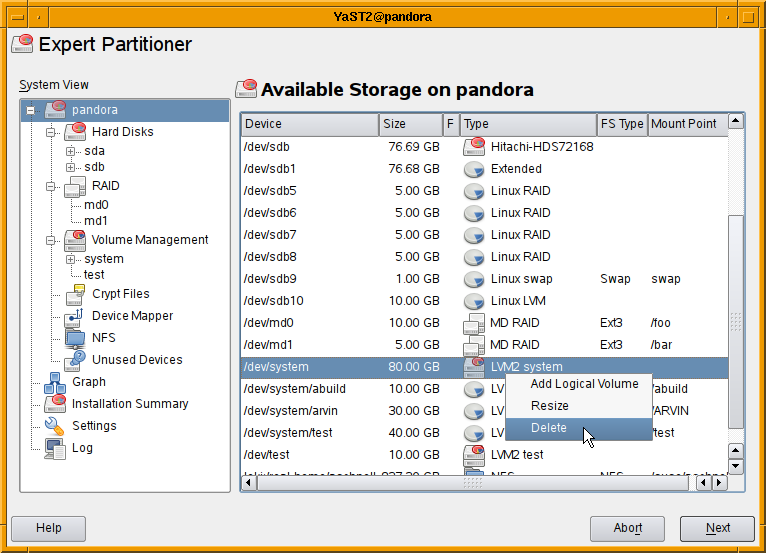
As usual comments are welcome.
Colors for Terminal Apps
#include <unistd.h>
#include <stdlib.h>
#include <string.h>

bool has_colors()
{
  if (::isatty(STDOUT_FILENO))
  {
    char *term = ::getenv("TERM");
    if (term && ::strcmp(term, "dumb"))
      return true;
  }
  return false;
}
This (translated to a C/C++ hybrid) is all that git (and now also zypper :O) does to detect the color capability of the
stdout. stout must be a terminal, and the TERM environment variable must not be "dumb". The idea is that most color-capable terminals understand the ISO 6429 (former ANSI) color control sequences, and if the above check fails for your terminal, you can configure git (and soon zypper :O) to never or always use colors (or set the TERM to "dumb").Regarding terminfo, i found it hard to learn and an overkill for just printing colored text (of course, once learned it can be used in other ways, too, e.g. to move the cursor, turn off input echoing when writing passwords, etc.). Maybe some other time.
On the other hand, ncurses are nothing for an existing terminal application which already does lots of output the usual way - you would have to rewrite all the output handling using ncurses. With ncurses it is that you write your app either with or without it from the start. But you cannot switch to it later, nor mix it with standard C I/O (
printf() or C++ streams (cout <<). At least that's my impression from what i've learned...So, zypper is now (since 1.1.0) a bit less boring, with colors :O) The idea is to print normal messages and progress in darker color, highlight important messages like results, warnings, errors, and color some special stuff, e.g. in install summary, default options in prompts, and so on. And it should be configurable, so that anybody can adapt it to his or her terminal background and text color. I'll write more about that once it's done.
python-TurboGears2 alive and kickin’ on the build service

Screenshot of TurboGears 2
It’s been quite a while since I last posted an update on the state of python-turbogears in the openSUSE build service. The TurboGears project currently has three branches open (which seems to cause more confusion that actually help people) – the 1.0 branch, the 1.1 branch and the 2.0 branch. Whereas newcomers are advised to install from the 1.0 branch and to develop web applications based on that branch, the truth is that most of the active development goes on in the 2.0 branch. TurboGears 2.0 is at beta7 stage right now – features are frozen and a release data is in sight for the big 2.0.
Without getting into the major differences between 1.0 and 2.0, many people on the TurboGears Google Group have expressed the opinion that the 2.0 branch, despite its beta suffix, is exceptionally stable and well suited to production deployment. One of the major obstacles facing people was how to actually install it. Because it requires some cutting edge packages which might not be standard fare for many distributions, it is recommended to install TurboGears2 (beta) in a virtual python environment using the virtualenv package. Once the new virtual environment is ready and activated, a simple easy_install will automatically install the TurboGears2 package and its requirements. This is well documented.
I got a bit fed up with the virtual environment setup – it worked fairly well, but I was constantly having to set up completely new virtual environments just to install another TurboGears web application. There is an option when using virtualenv, to make the entire virtual environment “mobile” (meaning that you can pack virtual environment plus web app off to another computer easily), but it wasn’t working for me.
Enter python-TurboGears2 on the openSUSE build service. It took me a couple of days to get all the dependencies in the correct versions and installing properly, but it looks as if it works now. As TurboGears2 will be in a more or less constant state of flux until the final 2.0 release, there will probably be quite a lot of work to do to keep the packages up to date, but it’s worth it for the simple zypper in python-TurboGears2 What I want to do now is to try creating a SUSE Studio based virtual appliance – that way practically any web app could be created and setup easily – and with a bit of elbow grease you could probably use apparmor etc to make it rock solid.
PS: it would be well cool if people would test the package
YaST Qt UI with Context Menus
Context menus are supported by almost all UI frameworks and most people got used to them. Therefore it’s high time to provide context menus in the YaST Qt UI as well. yast2-qt-2.18.6 offers this feature, packages are available in my build service repository.
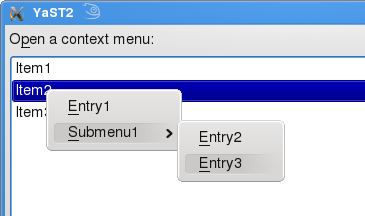
In four simple steps YCP programmers can benefit from this new feature:
Step 1:
Create a widget and tell via `opt(`contextMenu) that a ContextMenuActivated Event should be emitted when the user right clicks the widget:
`SelectionBox( `id(`sport), `opt(`notify,`immediate, `contextMenu),

                "Open a context menu:",

                [

                    "Item1",

                    "Item2",

                    "Item3"

                ] );
Step 2:
Wait and analyze events:
event = UI::WaitForEvent( ... );

...

if ( event["EventReason"]:"" == "ContextMenuActivated" )

...
Step 3:
Open a context menu. The argument of OpenContextMenu() describes the menu structure:
UI::OpenContextMenu( `menu(

[ `item(`id(`folder), "&Folder"  ),

`menu( "&Document",

[ `item(`id(`text),

"&Text File" ),

`item(`id(`image),

"&Image"     ) ]) ]  ));
Step 4:
Analyze the returned `id and trigger an action. An example called ContextMenu.ycp is included in the package yast2-ycp-ui-bindings.
Usability
A Context menu provides shortcuts to actions for a certain widget or item. This features improves usability when it’s used properly. Application programmers should avoid making certain features only using context menus because users might not find them.
Please keep in mind that YaST ncurses doesn’t provide context menus. Each operation that is only available via a context menu is useless in YaST ncurses because the user cannot select it.
Android Reloaded

On Monday night I got home from the pub, and my phone announced that there was an update available, and would I be so kind as to allow it to update itself. I said, 'Yes, that would be lovely', and my G1 proceeded to show me a nice updating screen while it changed all its software around.
There's not much to see for it. The Android Market now tells you when anything you've installed has an update available, which is nice. Google Maps is now version 3, but I can't tell the difference. The biggest changes though, have to be memory usage and power consumption. Previously, after using my phone on and off during the day at work, the battery level would generally be down around 40% when I came home. However, the last two days have seen it around 60% instead, which is a great improvement. The other change is that before the update, my /data partition had around 10Mb free on it, while after the update it has around 30Mb free. I don't know how they've done that. Perhaps shifted some space from the /cache partition? I never bothered noting the free space on anything other than /data before.