
NSA "ayudando" a MS

One-click install for Banshee Telepathy Sharing Extension 0.1.1

Well, it's pretty cool stuff, and now that he's started making releases, it's a great opportunity for people to try it out and give him feedback.
If you're using openSUSE 11.2, you can get version 0.1.1 of his extension through this handy one-click install link.
Note that my little repository includes upgrades to telepathy-gabble, telepathy-mission-control, and gnutls. You'll need to log out/in or kill all telepathy/empathy/mission-control processes before the changes take affect.
If you're like me and prefer to build Banshee from source and Neil's extension from source but don't want to reinstall your entire Telepathy stack from source, just install telepathy-gabble and telepathy-mission-control from my repository (this will cause a few gnutls packages to upgrade as well), and you'll be good to go.

Let me know if you have any issues, but let's consider these packages officially unsupported, could break your Empathy, impregnate your cat, etc.
ClusterSSH
La importancia de decir no, redux
La razón por la cuál tiene tantas opciones y funcionalidades son diversas, entre ellas destacan que atienden a necesidades de nichos de mercado muy especificos, es decir, el otro 10% de usuarios no promedio.
Una compañia como Microsoft tiene presupuesto suficiente para tener 10,000 desarrolladores trabajando en un solo producto, proporcionando todas y cada una de las opciones y funcionalidades que algún cliente requiere.
Pero, ¿eso es lo mejor para los usuarios? Es decir, usted o yo, que solo usamos el 10% de esas opciones y funcionalidades, cargamos a diario un software que es muy complejo (sin necesidad para nosotros) y que, al mismo tiempo, no nos hace más eficientes ni productivos. De hecho el exceso de entradas de código y funcionalidades le hace presa fácil de ataques de seguridad, como ha sucedido en el pasado con ActiveX y otras piezas de software.
¿Cómo puede una compañia de software pequeña competir con gigantes de la industria? La respuesta más sencilla es la más efectiva, pero también la más dificil de tomar: Sabiendo decir no.
¿Solamente decir 'no'? ¡Eso es fácil! Pensaran algunos incautos. No es cierto, decir "no" es todo un arte, en el cuál no puedes decir no a algo importante, pero si deberías decirle "no" a un feature que no sea indispensable para tu aplicación.
Muchas ocasiones se considera que el decir "no" puede malinterpretarse como un signo de debilidad, por ejemplo: Decirle "no" a nuestro jefe podría interepretarse como que no podemos con la carga de trabajo. Sin embargo, eso no es cierto. Más no siempre es mejor, y es nuestra responsabilidad profesional decirlo alto y claro. Lo importante es decir "Si" a las cosas que harán el producto, y decir "no" a aspectos que no necesariamente ayudarán de forma inmediata. Además recuerdese que un "no" hoy puede convertirse en un "si" para la siguiente versión. Estos "no" a tiempo hacen que los productos maduren.
Autor: Mauro Parra <mauropm@gmail.com>, embajador y desarrollador de openSUSE y evangelizador del uso de Software Libre en el mundo. Miembro de GUL Ciudad de México, UNAM LIDSOL, UNAM Larval Stage, IEEE y autor ocasional en INGENET. Mi página web. Sígueme en twitter @mauropm
Modos de firefox

Real-time MBTA bus location + Google Maps mashup
This weekend I read that the MBTA and Massachusetts Department of Transportation had released a trial real-time data feed for the positioning of vehicles on five of its bus routes. This is very important data to have, and while obviously everyone would like to see more routes added, it’s a start.
I decided to hack together a mashup of this data with Google Maps, to see how easy it would be. In the end it took me a few hours on Saturday to get the site up and running, and a couple more on Sunday adding features like the drawing of routes on the map, colorizing markers for inbound vs. outbound buses, and adding reverse geocoding of the buses themselves.
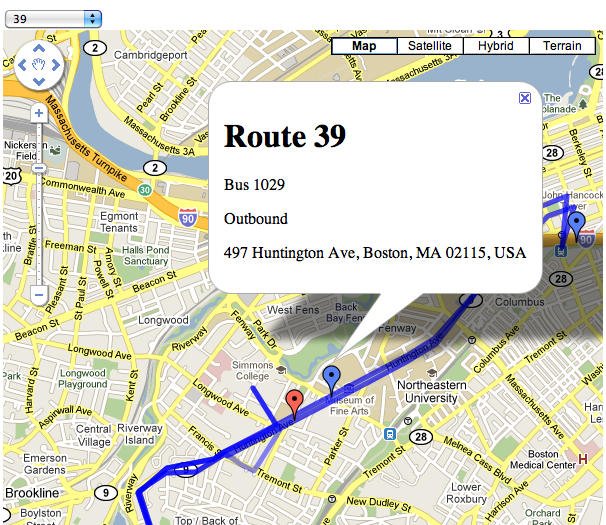
To do this I used three technologies (Google App Engine, JQuery, Google Maps) and two data sources (the real-time XML feed and the MBTA Google Transit Feed Specification files).
Google App Engine
App Engine is so perfectly suited for smaller, playtime hacks like this that it’s hard to imagine how anyone got anything done before it existed. The tedious, up-front bootstrapping that is required in so many programming projects has been enough to completely turn me off to small, spare-time hacking projects on occasion in the past. The brilliance behind a hosted software environment is obvious, but the amount of work to build a safe, hosted system with a fairly comprehensive set of APIs seems to be such a mountain of work that in many ways I find it surprising that anyone – even, perhaps especially, Google – built it at all.
I chose the Python SDK and the programming was straightforward and easy. It takes some elements from Django, with which I am familiar from work.
JQuery
A no-brainer. Hands down the best JavaScript toolkit available. Making the AJAX calls to get route and vehicle location information was a breeze, and the transparent handling of the XML data of the real-time feed prevents me from losing the will to live – a common feeling when dealing with XML.
My only complaint is with the documentation. While the API reference is good for any given piece of the API, the examples are a little light and there is absolutely zero cross-referencing to other parts, especially ones not a part of JQuery itself. It was not obvious, for example, how to deal with the XML document returned by the AJAX call. It sounds like the docs are getting some work, though, so this will hopefully improve.
Google Maps
This was my first endeavor with the Maps API, and it’s good. It’s not the best API in the world, but it’s hardly the worst either. Adding markers of different colors is annoying, but not so onerous as to make it tedious. The breadth of functionality provided is impressive, but then again it has been around for a few years at this point. Markers are easy to add, drawing the route map is absolutely trivial with a KML file, and even the reverse geocoding – which gives you a street address given a latitude/longitude pair – is straightforward.
The docs suck, though. There’s no indication that a size or anchor position is required when creating an icon for a custom marker – required for colors other than red – and due to the minified JS files tracking down that error took longer than any other task in the project. Reverse geocoding mentions that a Placemark object will be returned, but that class doesn’t appear anywhere in the reference documentation.
Real-time data feed
Lots to like. Straightforward, easy to parse. It’d be nice if I didn’t have to do the reverse geocoding to figure out what the street address is, but it’s not a dealbreaker. Main downside is that it’s XML as opposed to JSON. And of course, it’s only 5 bus routes and zero subway and commuter rail routes.
MBTA Google Transit Feed Specification files
A comprehensive set of data describing every transit route, every stop, and every route in the MBTA system. An impressive set of data encoded in a format designed for Google Transit. There is a set of example tools to view and manipulate this data, and one of those translates this data into a KML file for use with Google Maps. I should have tweaked the tools to output only the KML for the routes I cared about, but I did this by hand instead… not a big deal for only 5 bus lines. These KML files are fed into the Google Maps API to display the route as a blue line on the map when selected.
POKE 47196, 201
This is what a lot of programming is like now, for better and for worse.
On the one hand it is the perfect example of high-level component-oriented programming. Data is formatted in easily parseable interchange formats and plugged into well-defined interfaces. These interfaces plug into other interfaces. The result is a zoomable, pannable map with real-time bus location information that updates every 15 seconds. The lines-of-code count is around 100 including both Python and JavaScript. With a few hours work, I built something modestly useful out of nothing. I stand on the shoulders of giants.
On the other hand I didn’t really build anything. This is just assembly line programming. It was not a particularly creative endeavor, and it wasn’t challenging intellectually. Anybody could have done it. It’s cool, but there is little sense of accomplishment in the end product. It feels a little hollow.
Which is not to say that I didn’t enjoy it, or that it wasn’t worth the effort. I learned new technology, I played with software and data that I hadn’t had the opportunity to before. I broadened my horizons, however slightly. And it got me to write this blog post.
reiser4 for openSuSE-11.2
grab the “reiser4-kmp-$flavor” modules and required “reiser4progs” from:
regards,
have fun
Yo programo
Alguien sabe de algun proyecto similar en php/python?

PDF Mod 0.8
Robert Dyer, Andreu Correa Casablanca, Bertrand Lorentz, Gabriel Burt
Features
- Add * to beginning of window title when unsaved
- Can select more than one file in Open dialog
- shift-ctrl-z now also works for Redo
- Online docs now hosted on library.gnome.org
- Add Invert Selection action
- Launching with relative filepaths in args works
Bengali, Czech, Japanese, Russian
Translators
Alexandre Prokoudine, Daniel Nylander, Jorge González, Kris Thomsen, Łukasz Jernaś, Marek Černocký, Mario Blättermann, Og B. Maciel, Petr Kovar, Runa Bhattacharjee, Sankarshan Mukhopadhyay, Takeshi AIHANA
More Info
See the website for links to tarballs, git, packages, the mailing list, irc, bugzilla, and more.