
 miso
misoObject Oriented UI for YaST
After my last blog I worked on YaST (what a surprise) and didn't have any time to post anything until now.
Meanwhile I read some chapters from the "Thinking in Java" book. There are some chapters about OOP in general and it brings me to idea, how it would be great in YaST. As a side effect it also means get away from ycp ;-). Thanks to UI independence I can use Python with the YaST UI.
Here's some code example:
widget_library.py:
#!/usr/bin/python
# -*- coding: utf-8 -*-
import yui

class MainDialog:
   def __init__(self):
       self.factory = yui.YUI.widgetFactory()
       self.dialog = self.factory.createMainDialog()
   def __del__(self):
       self.dialog.destroy()

class Popup:
   def __init__(self):
       self.factory = yui.YUI.widgetFactory()
       self.dialog = self.factory.createPopupDialog()
   def __del__(self):
       self.dialog.destroy()


class TableDialog:
   def __init__(self, d):
       self.f = d.factory
       vbox1 =self.f.createVBox( d.dialog )
       self.f.createVStretch(vbox1)
       hbox1 =self.f.createHBox( vbox1 )
       self.f.createHStretch(hbox1)
       self.f.createHSpacing(hbox1,1)
       vbox2 =self.f.createVBox( hbox1 )

       self.Table( vbox2 )

       vspace =self.f.createVSpacing(vbox1,2)
       self.f.createHSpacing(hbox1,1)
       self.f.createHStretch(hbox1)
       self.f.createVStretch(vbox1)

       etype=-1
       while etype!=5:
           event = d.dialog.waitForEvent()
           etype = event.eventType()
           self.HandleEvent( event )
           print etype

   def Table(self,parent):
       vbox3 =self.f.createVBox( parent )
       self.customWidget(vbox3)
       theader = yui.YTableHeader()
       theader.addColumn("Targets")
       self.table =self.f.createTable( vbox3, theader )
       hbox2 =self.f.createHBox( vbox3 )
       self.pbAdd  =self.f.createPushButton( hbox2, "&Add" )
       self.pbEdit =self.f.createPushButton( hbox2, "&Edit" )
       self.pbDel  =self.f.createPushButton( hbox2, "&Delete")
       self.enableDisableButtons()

   def customWidget(self,parent):
       pass

   def HandleEvent(self,event):
       if (event.widget()==self.pbAdd):
           self.handleAdd(event)
       elif (event.widget()==self.pbEdit):
           self.handleEdit(event)
       elif (event.widget()==self.pbDel):
           self.handleDel(event)
       self.enableDisableButtons()

   def enableDisableButtons(self):
       self.pbEdit.setEnabled(self.table.itemsCount()>0)
       self.pbDel.setEnabled(self.table.itemsCount()>0)
main.py:
#!/usr/bin/python
# -*- coding: utf-8 -*-
import yui
from widget_library import *

class TargetDialog(TableDialog):
   def __init__(self,d):
       TableDialog.__init__(self,d)

   def customWidget(self,parent):
       hbox =self.f.createHBox( parent )
       self.f.createInputField(hbox, "Target")
       self.f.createInputField(hbox, "Identifier")

   def handleAdd(self, event):
       print "add target item"
   def handleEdit(self,event):
       print "edit target item ..."
   def handleDel(self,event):
       print "delete target item ..."

class MyTable(TableDialog):
   def __init__(self,d):
       TableDialog.__init__(self,d)

   def handleAdd(self,event):
       print "adding ..."
       TargetDialog(Popup())

   def handleEdit(self,event):
       print "edit item ..."
   def handleDel(self,event):
       print "delete item ..."

if __name__== "__main__":
       td = TargetDialog(MainDialog())
I know that code is not nice and not very useful, but here's some nice OOP examples:
inheritance, composition, etc ...
Easily put into constructor, what kind of dialog I want:
TableDialog(MainDialog()) or TargetDialog(Popup())
Inherit some class and override methods you want (see MyTable.handle*())
This is much better than generate file from template (as we do now).
I like this way and I'll keep working on it during my ITO.
Bye,
Michal
Moving on...
sonjakrauseharder. See you there!

Tomboy 0.13.5 Brings a Better Windows Installation Experience
From http://live.gnome.org/Tomboy/Installing/Windows :
Instructions for installing a Tomboy Windows release
Upgrading from Tomboy 0.13.4 or earlier
- Uninstall Tomboy.
- Uninstall any existing versions of gtk-sharp you may have installed.
- Continue with Installation instructions.
- Install Novell's gtk-sharp 2.12.8 or newer.
- Restart.
- Run Tomboy installer 0.13.5 or newer.
- Enjoy!
- On your Linux box, copy all of the *.note files out of ~/.tomboy .
- On your Windows box, quit Tomboy.
- On your Windows box, copy all the *.note files from Linux into %APPDATA%\tomboy .
Thanks so much to Mike Kestner for working his ass off (on his own time) updating the gtk-sharp installers, making them easier to develop and build, and fixing the issues reported by Tomboy users. Apps like Tomboy, Banshee, and GNOME Do would simply not exist without all of his hard work.

More r6xx mysteries
It really took a long night (and approx. a hundred reboots) to find this:
When you want to
- change VGT_INDX_OFFSET / VGT_MIN_VTX_INDX / VGT_MAX_VTX_INDX or
- switch to a different shader
Today in the office I found out that this is only necessary on my laptop's M72, on RV610, on RV630, and on RV635 - but not on RV670 or RV770. So this is chipset specific, but not VC releated...
What - as I assume - happens is that only a write to the render target registers stalls writing to the VGT and shader registers, so this seems to be some kind of flaw in the pipelining logic on some of the chips. As setting the render target again doesn't have a too big performance impact, I assume it's best to do it regardless of the chipset.
Latest and greatest(untested)?!
- 2.6.24 on January 24th 2008,
- 2.6.26 on July 13th, 2008, and
-
2.6.27 on October 9 2008
Here is when it reached the users
- Gentoo 2008.0 released on July 6, 2008 has linux 2.6.24 which was ~5.5 months old.
- Ubuntu 8.10 released on October 30th, 2008 has 2.6.27 which was ~0.6 months old.
- Fedora 10 released on 25 November 2008 has 2.6.27 which was ~1.5 months old.
- Opensuse 11.1 released on December 18th, 2008, has 2.6.27 wihch was roughly ~2.3 months old.
- Debian 5.0 released on February 14th, 2009 has 2.6.26 which was roughly ~7 months old.
Distros used by power-users seems to be always running slightly older version compared to the distros aimed at the layman! Yeah, but power users^Wdevelopers use the unstable/development/factory/head version of their favourite distro and not the released stable. But Ubuntu stable(!) is based on debian unstable! And debian stable is so outdated. opensuse seems to be quiet the latest but not straight from the unstable development snapshot.
p.s: I use only opensuse regularly among these distros. So any mis-information and bias is likely. ;)

 Member
Install more packages? ["Yes"]["No"]
It was the same with YaST package manager and pop-up question from the title of this post. I'm sure we all remember that one:
It was introduced in openSUSE 10.1 (aka BrokenSwManagement edition) in order to alleviate suffering of the poor users forced to use our package management (powered by zmd and baby-libzypp) with ultra-slow start-up. libzypp grew faster and faster over the time, but the pop-up question remained and (quite reasonably) it started to annoy users. "Why do I have to click to have this crappy pop-up disappear?" they asked. "I've made my choice, installed all packages I wanted, so I want to answer no further questions."
After many heated discussions, we finally made the pop-up go away in openSUSE 11.1 After clicking on 'Accept' and installing all packages, package manager simply ended. That, of course, made the other half of the users speak up: "Why YaST does not ask anymore whether I want to install more packages? I don't want to start package manager anew each time. I simply want to have an option to install something more I forgot about in the first round."
In openSUSE 11.2, my colleague lslezak (now the link to his blog should be here, but he is too shy to have one :)) used really ingenious way of cutting the Gordian knot - he made the behaviour on exit from package manager configurable. And not only that - besides an option to close package manager (for those who want to be done with it) and option to restart it (for those who may want to come back and select something more), he added a third one. When the package installation is over, you can choose to display a neat summary of what has been installed/deleted, how long did it take and view some detailed logs. Then, you can either finish, or go back to install more packages:
Now all you have to do is to open /etc/sysconfig/yast2 file in your favourite editor and set PKGMGR_ACTION_AT_EXIT variable to some reasonable value. Please find more detailed information here.
"But I don't want to edit some cryptic file manually," you might think. "Isn't there any other way?" Well, of course there is. YaST ncurses package manager has a brand new menu that allows you to pick the exit action of your choice in a few key presses:
There are some minor things left to polish, but it basically works by now. Better don't ask me how the sysconfig variable is actually written :-) It took me by surprise to realize that libzypp's interface to sysconfig is read-only, so I'm impatienly waiting for Augeas ;-)
Riding the D-Bus with Ruby
Riding the D-Bus with Ruby
The last time I looked at D-Bus is a couple of years ago. What I saw back then was promising in technology but ugly in (C-)programming. D-Bus has come a long way 'til then.And so have my programming skills with scripting languages, esp. with Ruby. The ruby-dbus project provides a nice and easy-to-use programming API, once one has mastered the lack of examples and the D-Bus nomenclature.
About D-Bus
There is plenty of information available on D-Bus. I personally found the Introduction to D-Bus most valuable from a developers point of view.
D-Bus originates from the freedesktop.org initiative and is hosted at www.freedesktop.org
Basically, D-Bus is a RPC (remote procedure call) mechanism, allowing different programs to talk to each other and provide services in a standardized way.
The transport used for talking is called a bus, meaning everyone can ride (connect to) it. Usually there are two independent buses available
- System bus
This is for system-wide services, like hardware information (usually provided by HAL) - Session bus
This is for per-login services, like a Gnome Desktop session.
The nice thing about D-Bus is that it allows introspection. You can ask a service about its capabilities. And the D-Bus itself is a service, so you just need to know about org.freedesktop.DBus to find all other services.
Services provide objects. These are organized in a tree-like fashion and typically addressed using slash-separated paths, just like filenames. Iterating over the objects of org.freedesktop.Hal gives you all devices.
Objects then have members. Members are methods to call, providing the functionality of the service. To make things more
Putting it all together gives you this chain
Bus (System/Session)
-> Service (e.g. org.freedesktop.Hal)
-> Object (e.g. /org/freedesktop/Hal/devices/storage_model_DVDRW_LH_20A1S)
-> Interface (e.g. org.freedesktop.Hal.Device.Storage.Removable)
-> Member (e.g. bool CheckForMedia())
Using ruby-dbus
Connecting to the bus in Ruby is as easy asrequire 'dbus' bus = DBus::SystemBus.instance # resp. 'bus = DBus::SessionBus.instance'DBus::SystemBus is a Singleton, hence the .instance instead of the usual .new for creating the object.
Now you can create a proxy object. Its named 'proxy' because the real object lives on the other side of the connection, in the service. The proxy object is in your application and proxy-ing calls via D-Bus to the service object. You can use this to find all services on the bus
require 'dbus'

bus = DBus::SystemBus.instance

bus.proxy.ListNames[0].each do |service|
  puts "Service: #{service}"
end
Given a known service, D-Bus introspection allows to find its objects, subnodes and interfaces
require 'dbus'

bus = DBus::SystemBus.instance

# Create the proxy object
proxy = bus.introspect "org.freedesktop.Hal", "/"

# proxy.bus gives you the bus
# proxy.path is the object path
# proxy.destination is the service name

# Print object interfaces
proxy.interfaces.each do |interface|
  puts "Object #{proxy.path} provides #{interface}"
end

# Print object subnodes
proxy.subnodes.each do |path|
  puts "-> #{proxy.path}/#{path}"
end
A specific interface of an object can be accessed by the [] operator. And the interface knows about the signature of its methods.
require 'dbus'

bus = DBus::SystemBus.instance
# create proxy for the 'computer' device
proxy = bus.introspect "org.freedesktop.Hal", "/org/freedesktop/Hal/devices/computer"

# Print object interfaces
proxy.interfaces.each do |interface|
  puts "Object #{proxy.path} provides #{interface}"
  proxy[interface].methods.each do |key,value|
    puts "  #{value.rets} #{key}( #{value.params} )"
  end
end
Due to the dynamic nature of Ruby, Object methods are directly accessible in normal Ruby conventions. One just has to select the right interface first.
require 'dbus'

bus = DBus::SystemBus.instance
proxy = bus.introspect "org.freedesktop.Hal", "/org/freedesktop/Hal/devices/computer"

iface = proxy["org.freedesktop.Hal.Device.CPUFreq"]
freq = iface.GetCPUFreqPerformance
gov = iface.GetCPUFreqGovernor
puts "Frequency #{freq}, Governor #{gov}"
Riding the D-Bus with Ruby is easy and fun !
Writing first YCP program
Hi folks!
It was a long time since my last blog. 
Today, i will show you my first program, it`s a simple test program which shows basic functions of YCP
Let`s start!!
first of all, you need all core development YaST and QT packages
(All mentioned bottom steps, can be made with normal user )
second , you must create a symlink to /usr/lib/YaST2/bin/y2base
$ ln -s <destination> <linkname>
(In my case name of symlink is y2base.)
third , you need two console`s , one for program writing and one for monitoring .y2log (where you can see all debug messages)
if you wish more detailed debug output during root session, than type in console following :
$ su
$ export Y2DEBUG=1
$ exit
(switching back to normal user)
Ok, lets see the code of PushButton.ycp !
{
// Build a dialog with one button and two labels.
// Wait until that button is clicked,
// then close the dialog and terminate.
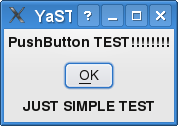
UI::OpenDialog( `VBox(
`Label(`opt(`boldFont),”PushButton TEST!!!!!!!!”),
`PushButton( “&OK” ),
`Label(`opt(`boldFont),”JUST SIMPLE TEST”)
)
);
UI::UserInput();
UI::CloseDialog();
}
Than:
$ chmod 765 PushButton.ycp
After you have written the program , type in the console:
$ ./y2base ./PushButton.ycp qt
You will get following window:
What is amazing at YCP, that this code can be interpreted into ncurses
Try following command:
$ ./y2base ./PushButton.ycp ncurses
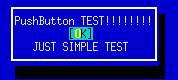
Result:
You have written only one code , which can be used in two different gui environments graphical and text mode!
In my next blog i will write about creating own SCR Agent.

Fun with Studio
I’ve been working on a new project now for a while called SUSE Studio. Essentially it is a web interface which allows you to build your own customized version of SUSE. You can select packages, do some configuration, and even add your own branding.
I created a media center appliance to see how hard it would be. The appliance is based on openSUSE 11.1, and boots right into the excellent Elisa Media Center. You can download the image here. The tarball contains one file, which you can ‘dd’ to a USB storage device. We’re working on writing a small application to make this part easier.
On the first boot it will do some one-time setup like repartition and resize the disk, install NVIDIA or ATI video drivers (if appropriate), and setup X.

FOSDEM
FOSDEM is ... strange. Lots of people, everything crowded, hot devrooms (cooling probably not paid for the weekends). Listened to some of our talks and the Debian keynote. With the task of finding out more about motivating our community I was a bit at loss.
My Wine talk on Sunday noon was well received, around 110 listeners according to Juergen. I do not understand why so much people are interested in the topic, remembering Security with just 20 listeners 3 years ago...
The video will show up tomorrow on the FOSDEM 2009 overview page.
And here are is my Flickr Set of images.