
alpのCockpitでpodmanを制御してみる
さて、毎度ながらの説明ですが、ALP (Adaptive Linux Platform)は、SUSEとopenSUSEで開発している次世代OSのベースです。イミュータブルで軽量な仕様となっています。
この冬発売のGeeko MagazineにインストールとCockpitというブラウザから管理できるアプリの体験記を書いていますので、ぜひ皆さん試してみてください。
今日はalpで動かしているCockpitから、podmanを制御してみたいと思います。
まず、左側に「Podmanコンテナー」というメニューがあるので、そこを選択します。
すると、画面にPodmanサービスを有効化というボタンが表示されるので、クリックして有効化します。(すみません、スクショを撮り損ねてしまいました)
すると、イメージやコンテナーなどを制御できる画面が表示されます。
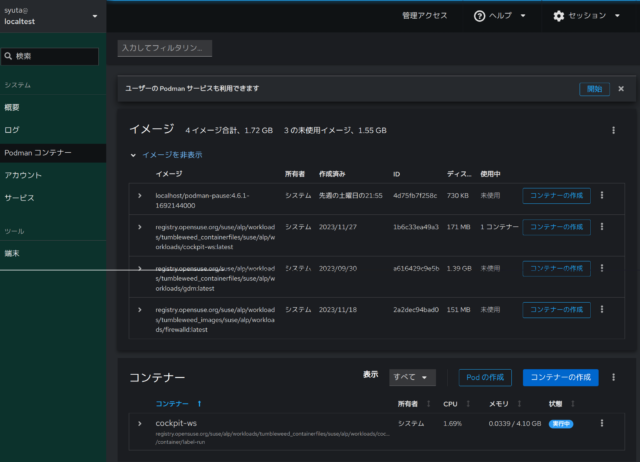
かなり直感的な操作ができそうです。
では、コンテナーを作成してみます。右下にある「コンテナーの作成」をクリックすると、コンテナー作成ダイアログが表示されます。
試しでnginxを作成してみます。
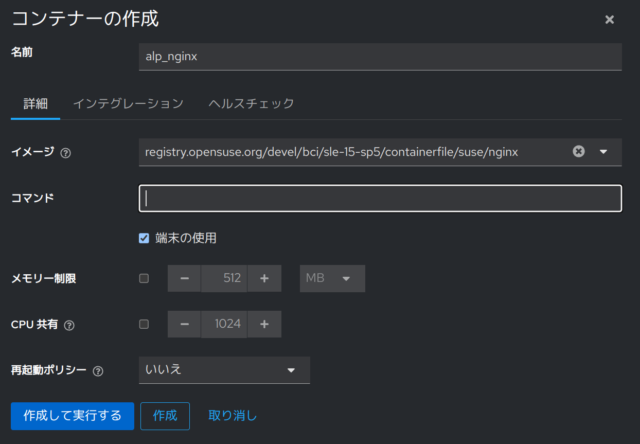
イメージの所にnginxと入れると、候補が表示されて、そこから選ぶことができました。
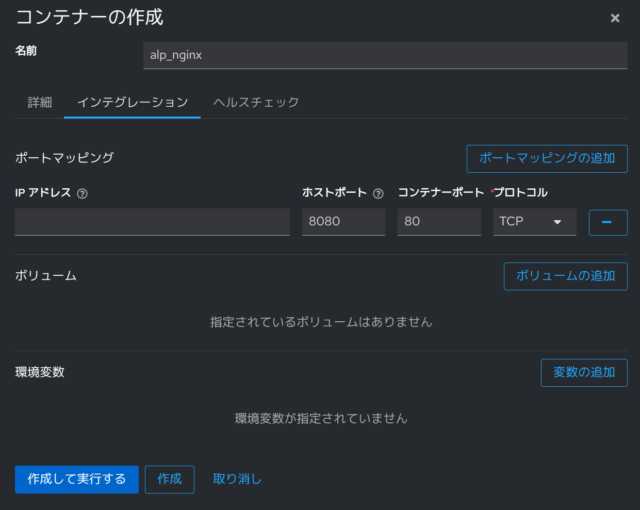
また、ポートマッピングもしておきます。「インテグレーション」タブで設定できました。
左下の「作成して実行する」をクリックします。すると、イメージのダウンロードが始まりました。

少しすると、無事実行中になりました。

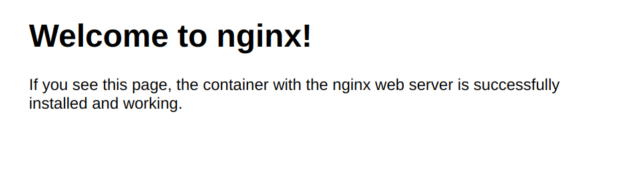
ホストのブラウザからアクセスすると、nginxが起動していることが確認できました。
停止や削除などの操作も一通り画面から行えました。Podman、というかコンテナーの基礎知識は必要だなとは思いましたが、かなり直感的で使いやすかったです。
 Member
 baltolkien
Episodio 22 de KDE Express: La mejor distro para KDE
Tras un parón obligado por razones de peso, me congratula presentaros que tenemos a nuestra disposición el episodio 21 de KDE Express, titulado «La mejor distro para KDE» donde David Marzal, con el apoyo de Jorge Lama en la post-producción, contesta a la pregunta del millón: ¿CUál es la mejor distro para KDE?
Episodio 22 de KDE Express: La mejor distro para KDE
Comenté hace tiempo que había nacido KDE Express, un audio con noticias y la actualidad de la Comunidad KDE y del Software Libre con un formato breve (menos de 30 minutos) que complementan los que ya generaba la Comunidad de KDE España, aunque ahora estamos tomándonos un tiempo de respiro por diversos motivos, con sus ya veteranos Vídeo-Podcast que todavía podéis encontrar en Archive.org, Youtube, Ivoox, Spotify y Apple Podcast.

De esta forma se llega al número 22, el décimo de su segunda temporada y que cuenta con el incombustible e hiperactivo David Marzal con la edición de Jorge Lama, nos habla de la pregunta del millón: ¿qué KDE nos puede venir mejor?
En palabras de David, que es quien hace la entradilla:
Reflexión sobre «la mejor distro», Krita, feed de Compilando Podcast, fiesta por Plasma6, Slimbook tiene nueva tienda y Promo de Disperso Tiempo Escaso.
PD: Reunión de socios KDE España el 20 de diciembre, es decir el miércoles de la semana que viene.
Enlaces de interés:
- La mejor distro para KDE : https://masto.es/@ruisan/111499296802097617
- https://krita.org/en/item/broken-rules-sponsors-krita/
- Cambio de URL en Compilando Podcast : https://compilando.es/index.php/feed/podcast/
- https://www.kdeblog.com/slimbook-renueva-su-pagina-web.html
- Eventos por la MegaRelease de Plasma6: https://community.kde.org/Promo/Events/Parties/KDE_6th_Megarelease
- https://disperso.tiempoescaso.com/
Subtitulos disponibles en podverse.fm o en podcastindex.org si vuestra aplicación no implementa las transcripciones.
- Agradecimientos:
- Jorge Lama por su asistencia, consejo, apoyo y edición de audio en este episodio.
- Erotic by Frank Schroeter – (CC BY 4.0)
Y, como siempre, os dejo aquí el listado de los episodios. ¡Disfrutad!
Por cierto, también podéis encontrarlos en Telegram: https://t.me/KDEexpress
La entrada Episodio 22 de KDE Express: La mejor distro para KDE se publicó primero en KDE Blog.

Guide étape par étape pour réinitialiser votre iPhone
L’iPhone est l’un des smartphones les plus populaires et performants sur le marché, mais il peut arriver qu’il présente des problèmes qui nécessitent une réinitialisation. Que ce soit pour résoudre des bugs, nettoyer l’appareil avant de le vendre, ou simplement le remettre à zéro, il est crucial de savoir comment réinitialiser son iPhone. Cet article vous guidera à travers les différentes méthodes pour effectuer cette opération, que vous utilisiez un Mac, un PC, ou que vous préfériez le faire sans ordinateur.
Ce qu’il faut savoir avant de réinitialiser son iPhone
Avant de réinitialiser votre iPhone, il est essentiel de sauvegarder toutes vos données. La réinitialisation effacera toutes les données et les paramètres de votre iPhone, le ramenant à son état d’origine. Assurez-vous d’avoir une sauvegarde récente de votre iPhone pour ne pas perdre d’informations importantes. De plus, veillez à désactiver le verrouillage d’activation (Find My iPhone) pour éviter tout problème pendant le processus de réinitialisation.
Comment réinitialiser son iPhone
Pour réinitialiser un iPhone, vous pouvez suivre les étapes suivantes :
- Ouvrez l’application Réglages sur votre iPhone.
- Appuyez sur Général.
- Faites défiler vers le bas et appuyez sur Réinitialiser.
- Choisissez « Effacer contenu et réglages ».
- Confirmez votre choix et attendez que l’iPhone s’efface complètement.
Une fois l’opération terminée, votre iPhone sera revenu à ses paramètres d’usine. Vous pourrez alors le configurer comme si vous veniez de l’acheter.
Comment réinitialiser son iPhone avec un Mac
Si vous possédez un Mac, vous pouvez utiliser iTunes pour réinitialiser votre iPhone. Voici les étapes à suivre :
- Assurez-vous d’avoir la dernière version d’iTunes installée sur votre Mac.
- Connectez votre iPhone à votre Mac à l’aide d’un câble USB.
- Ouvrez iTunes et sélectionnez votre iPhone.
- Cliquez sur « Restaurer l’iPhone ».
- Confirmez votre choix et attendez que la réinitialisation soit effectuée.
Une fois la réinitialisation terminée, vous pourrez configurer votre iPhone comme neuf.
Comment réinitialiser son iPhone avec un PC
Si vous utilisez un PC avec Windows, vous pouvez utiliser iTunes pour réinitialiser votre iPhone de la même manière qu’avec un Mac. Suivez les étapes précédentes en remplaçant simplement « Mac » par « PC » dans les instructions. Il est important de noter que iTunes n’est plus pris en charge par Apple sur les dernières versions de macOS, il est donc préférable d’utiliser un Mac plus ancien ou un PC Windows pour cette méthode de réinitialisation.
Comment réinitialiser un iPhone sans ordinateur
Si vous ne disposez pas d’un ordinateur, vous pouvez toujours réinitialiser votre iPhone directement depuis l’appareil. Voici comment procéder :
- Allez dans les Réglages de votre iPhone.
- Appuyez sur Général.
- Faites défiler vers le bas et appuyez sur Réinitialiser.
- Choisissez « Effacer contenu et réglages ».
- Entrez votre code d’accès ou votre identifiant Apple si nécessaire, puis confirmez.
Après ces étapes, votre iPhone sera réinitialisé et prêt à être configuré à nouveau.
| Méthode | Appareil requis |
|---|---|
| Réinitialisation depuis l’iPhone | iPhone uniquement |
| Réinitialisation avec un Mac | iPhone, Mac, câble USB |
| Réinitialisation avec un PC | iPhone, PC Windows, iTunes, câble USB |
Une fois la réinitialisation effectuée, vous pourrez restaurer votre sauvegarde et retrouver toutes vos données sur votre iPhone. Assurez-vous de suivre ces étapes avec précaution pour éviter toute perte de données irréversible.
[‘Prochaines étapes’] Après avoir réinitialisé votre iPhone, vous pourrez le configurer selon vos besoins et restaurer vos données. Assurez-vous de mettre en place une sauvegarde régulière pour prévenir toute perte de données à l’avenir. En suivant les instructions fournies dans cet article, vous pourrez facilement réinitialiser votre iPhone en fonction de votre équipement disponible.
FAQ
Comment remettre à zéro un iPhone ?
1. Allez dans l’application Réglages de votre iPhone. 2. Sélectionnez Général, puis Réinitialiser, et choisissez Effacer contenu et réglages. 3. Entrez votre mot de passe ou votre code d’accès si vous en avez un, puis confirmez la réinitialisation.
Comment mettre à zéro un iPhone pour le vendre ?
Allez dans Réglages > Général > Réinitialiser > Effacer contenu et réglages. Cela effacera toutes les données et réinitialisera l’iPhone à ses paramètres d’usine. Assurez-vous d’avoir une sauvegarde de vos données avant de le faire.
Comment Réinitialiser un iPhone avec les boutons ?
Pour réinitialiser un iPhone avec les boutons, appuyez et relâchez rapidement le bouton ‘Volume haut’, faites la même chose avec le bouton ‘Volume bas’, ensuite, maintenez le bouton ‘Power’ (sur le côté ou en haut de l’iPhone) jusqu’à ce que le logo Apple apparaisse.
Comment tout effacer d’un iPhone ?
Allez dans ‘Réglages’ > ‘Général’ > ‘Réinitialiser’. Cliquez ensuite sur ‘Effacer contenu et réglages’ pour supprimer toutes les informations et les réglages de votre iPhone. Confirmez l’action et votre iPhone sera réinitialisé à ses paramètres d’usine.
L’article Guide étape par étape pour réinitialiser votre iPhone est apparu en premier sur Astuces Tech.
budgie-extras: Multiple Predictable /tmp Path Issues in Various Applications
This report is about a range of predictable /tmp path issues in various applications in the budgie-extras repository. This repository contains a range of helper applications for the Budgie desktop environment.
During a routine review of applications that are autostarted in X11 environments I found the issues 1) to 4) outlined below. Upstream found two additional cases of predictable /tmp path uses that they addressed, as outlined in items 5) and 6). Upstream released version 1.7.1 today which fixes all the issues.
Introduction
The affected programs are mostly written in the Vala programming language, some are also scripted in Python. In all cases predictable paths in /tmp containing only the username or no variable components at all are used. In these paths regular files or directories are created. The paths are often used as a kind of inter-process-communication between two or more budgie-extras components.
The impact of the issues differs a lot depending on the actual affected program and ranges from denial-of-service to information leaks to integrity issues through manipulation of the data which is used e.g. for displaying images on the desktop. All the issues are restricted to local attackers, naturally.
Without the Linux kernel’s protect symlink sysctl setting the severity of the issues will in some cases be worse. Even with this protection enabled it is often possible to pre-create the files or directories as another local user, granting world read and write access, which will cause the budgie-extras applications to use them even though they are attacker controlled.
Without the Linux kernel’s symlink protection many of these findings where files are created look like they might allow symlink attacks to have files created in arbitrary locations. The Vala file creation calls I looked into are mostly translated into the following system call, though:
openat(AT_FDCWD, <path>, O_WRONLY|O_CREAT|O_EXCL|O_CLOEXEC, 0666)
Even tough this is missing the O_NOFOLLOW flag, symlinks would not be
followed, due to the combination of O_CREAT and O_EXCL. I will point
out cases where symlink attacks might still be possible in spite of
this.
As a quick fix for all of these issues I suggested to use
$XDG_RUNTIME_DIR instead of /tmp. This directory is private to the
logged in user and cannot be manipulated by other users in the system.
In the instances where these files are used as a simple communication
mechanism (“trigger” logic) it could be considered using sockets, the
D-Bus session bus or named FIFOs instead - also placed in safe
locations, of course.
Following is a detailed listing of all individual issues based on the budgie-extras Git repository tag for version 1.7.0.
1) budgie-window-shuffler (CVE-2023-49344)
1.1) Path /tmp/shufflerapplettrigger_<user>
In src/shuffler_control.vala line 1740
first an attempt is made to delete this path. Then it starts monitoring the
path, reacting to its creation, by automatically selecting (popping up) the
“Applet” listbox GUI entry.
The counterpart to this is found in applet/src/ShufflerApplet.vala line
91, where this file is created to let the
settings dialog open.
The worst that can happen here is likely confusing the victims GUI so it is low severity.
1.2) Path /tmp/<user>_shufflertriggers/layoutspopup
In src/toggle_layouts_popup.vala line 62
first an attempt is made to create the directory, ignoring any potential
errors - considering it to already exist. Then the “layoutspopup” file is
created within the directory. Depending on program evaluation logic the string
“fromcontrol” is written to the file, otherwise the file remains empty.
In src/layouts_popup.vala line 1384
monitoring for this file is setup, its content is read (it is checked whether
it contains “fromcontrol”) and then a popup window is either created or
destroyed, depending on the current program state.
Another user in the system can pre-create this directory and then control the creation and destruction of the popup dialog, thereby confusing the victim’s GUI. By placing a FIFO instead of a regular file at “layoutspopup”, the layout popup will be subject to denial-of-service (either by blocking it indefinitely or by feeding it large amounts of data, leading to an out-of-memory situation).
Without the Linux kernel’s symlink protection the issue can be used to
make the layouts_popup program read from arbitrary files, or to
operate in arbitrary directories.
1.3) Path /tmp/<user>_running_layout
In src/run_layout.vala line 203 this file
is created to “temporarily disable possibly set windowrules”. In line 379 this
path is (needlessly) constructed again and passed to function
create_busyfile(), although this parameter remains unused by the function.
In line 478 stat() and unlink() are attempted on the file.
In src/windowshufflerdaemon.vala line 831
an existence check for this file is made. If it exists then the run_rule
program will not be executed for any windows.
This path allows a local attacker to prevent the victim’s run_rule
ever to be executed.
1.4) Path /tmp/<user>_gridtrigger
In src/togglegui.vala line 33 an
existence check is made for this path and depending on the outcome it is
either created as an empty file, or deleted.
In src/windowshufflerdaemon.vala line
992 in function actonfile()
there is a reaction to the creation and deletion of this path. Depending
on this the gridguiruns boolean is set to true or false respectively.
If it is set to false then a window will be destroyed in line 1148.
In src/gridwindow.vala line 637 a
monitor is setup for this file and depending on it being created or being
deleted the gridwindow is being displayed or destroyed.
This path basically allows a local attacker to make the “grid window”
managed by the gridwindow program appear, thereby confusing the
victim’s GUI. The other way around windowshufflerdaemon can be
caused to destroy its “preview window” if this state file is under a
local attacker’s control.
1.5) Path /tmp/shuffler-warning.png
In src/windowshufflerdaemon.vala line 1017
in function create_warningbg() this path is used to write a programmatically
created PNG image into. In function show_awarning() in line 338 the program
sizeexceeds_warning is executed which in turn in
src/sizeexceeds_warning.vala line 68
displays the generated PNG image on the desktop.
A local attacker can attempt to place arbitrary PNG data in this path and have it displayed on the victim’s desktop. Placing crafted PNG data could allow to exploit further security issues in image processing libraries.
1.6) Path /tmp/<user>_istestingtask
This path is potentially created in src/layouts_popup.vala line
492. The file receives data from the GUI
interface. In src/run_layout.vala line
407 this path is picked up again and its
content is interpreted in extractlayout_fromfile().
Since this file’s content is evaluated and used for further program
logic there is a chance for a local attacker to massively break the
run_layout program’s logic or maybe even achieve code execution. The
Linux kernel’s protected_regular sysctl setting comes to the rescue
here, though. The open() with O_CREAT will fail. It can then
still present a denial-of-service vector, though.
Upstream Fix
This is fixed in upstream commit 11b0201. The public
/tmp directory has been replaced by the user’s private $XDG_RUNTIME_DIR,
with a fallback to the user’s home directory.
2) budgie-wpreviews (CVE-2023-49347)
2.1) Path /tmp/<user>_window-previews
This path is used for a directory. In src/separate_shot.vala line
43 it is created, errors are ignored. In line 105
screenshots of certain X11 windows are placed in the directory following the
name scheme <window-id>.<workspace-name>.png.
In src/previews_creator.vala line 74 an attempt to
create the directory the same way is found. In line 241 the directory is
iterated over and each file found there, independently of its name, will be
assembled in a file list. This file list is luckily only used for removing
files of non-existent windows in this program.
In src/previews_daemon.vala line 719 there is
another attempt to create the directory the same way as in the other two
locations. In line 523 the directory is again iterated over and a list of the
contained filenames is assembled, independently of their names. In line 404
the filenames are interpreted and split into X11 window IDs and workspace
names again. It seems the code expects all filenames to match the pattern, if
this is not the case then the program will likely crash. The resulting file
list is (luckily) matched against the existing X11 window IDs in line 421.
Even without exploiting the fixed temporary directory path this directory has security issues, since it is created world-readable. Any other users in the system can access the window screenshots that are created there and thus this is an information leak.
Since all errors trying to create the directory are ignored, another
local user can pre-create this directory world-writable, and the
wpreviews applications will still use the directory which is now under
attacker control. The attacker can place additional PNG image files
there, trying to confuse the victim’s GUI experience. A local DoS
against the previews_daemon seems also possible by placing
non-conforming files into the directory. Since the previews_daemon
only uses files from the directory for which an existing X11 window is
found, the complexity for a local attacker to inject arbitrary PNG files
into the preview logic is raised. It can still be possible by observing
the PNG files created by e.g. the separate_shot program and replacing
them with crafted data.
Without the Linux kernel’s symlink protection a local attacker can place a symlink there instead of a directory, causing the programs to operate in arbitrary other directory locations.
2.2) Paths /tmp/<user>_prvtrigger_*, /tmp/<user>_previoustrigger, /tmp/<user>_nexttrigger
This long list of trigger files:
/tmp/<user>_prvtrigger_all
/tmp/<user>_prvtrigger_current
/tmp/<user>_prvtrigger_all_hotcorner
/tmp/<user>_prvtrigger_curr_hotcorner
/tmp/<user>_previoustrigger
/tmp/<user>_prvtrigger_all
/tmp/<user>_nexttrigger
is used both in src/previews_triggers.vala line
43 and src/previews_daemon.vala line
664.
The previews_triggers program selects one of these trigger paths
depending on command line arguments, various logical evaluations and
depending on whether some of the paths already exist. The selected path
is then simply created with empty content.
In previews_daemon these paths are monitored and their existence is
evaluated in a complex fashion to display previews of existing windows.
In conjunction with the issues in 2.1) this can be used to display
attacker controlled images on the victim’s screen at arbitrary times,
provided that the victim user is running the previews_daemon.
Apart from the security related problems this group of files for controlling a daemons behaviour seems ill devised. Instead proper IPC mechanisms should be used.
Upstream Fix
This is fixed in upstream commit 588cbe6. The public /tmp
directory has been replaced by the user’s private $XDG_RUNTIME_DIR, with a
fallback to the user’s home directory.
3) budgie-takeabreak (CVE-2023-49345)
3.1) Path /tmp/nextbreak_<user>
This file is read in budgie_takeabreak.py line 245 and
the resulting string is split on “.”, the first element resulting from this is
used as the new “time” displayed in the GUI.
In takeabreak_run line 80 this path is created and the
next “break time” is written to it.
A local attacker can pre-create this file and have arbitrary string content displayed instead of the actual “next time”. A denial-of-service will also be possible e.g. by placing a FIFO there.
Upstream Fix
This is fixed in upstream commit 588cbe6. The public /tmp
directory has been replaced by the user’s private $XDG_RUNTIME_DIR, with a
fallback to the user’s home directory.
4) budgie-weathershow (CVE-2023-49346)
4.1) Path /tmp/<username>_weatherdata
In src/weathershow/WeatherShow.vala line 354 the
current “weather data” is written to this location. Before this an attempt is
made to delete an already existing file. Errors for both, deletion and
creation of the file, are ignored unconditionally.
In line 236 the content from this file is read and interpreted for updating GUI window data.
A local attacker can pre-create this file and thus manipulate the data displayed by the weather applet. Also a denial-of-service will be possible e.g. by placing a FIFO there.
Upstream Fix
This is fixed in upstream commit 0092025. The public
/tmp directory has been replaced by the user’s private $XDG_RUNTIME_DIR,
with a fallback to the user’s home directory.
5) budgie-clockworks (CVE-2023-49342)
This issue was not discovered by me but by upstream while working on the fixes for the other issues I reported. For completeness I mention it in this report as well.
5.1) Path /tmp/<user>_clockworks
This path is used as a directory in the Python script
cwtools.py. It
is reused if it already exists. The scripts generates SVG vector
graphics in there, converts them to the PNG image format and saving them
in the users home directory in ~/.config/budgie-extras/clockworks.
Here, again, the image data can be manipulated by a local attacker by pre-creating this directory. In this case the data will even be persisted in the user’s home directory. Crafted SVG of PNG data could be placed in the directory to try attacking the image processing libraries used.
Upstream Fix
This is fixed in upstream commit d030837. The public /tmp
directory has been replaced by the user’s private $XDG_RUNTIME_DIR, with a
fallback to the user’s home directory.
6) budgie-dropby (CVE-2023-49343)
Like issue 5), this issue was not discovered by me but by upstream while working on the other issues I reported. For completeness I mention it in this report as well.
6.1) Path /tmp/<user>_keepdropbywin
This path is used as a “timer” file in the checkonwin and
dropover Python scripts. The file’s content is not
evaluated, but the checkonwin script runs wmctrl -c dropby_popup if the
file doesn’t exist for more than six seconds.
The Python openat() call uses O_CREAT | O_EXCL flags so symlink
attacks are not a problem even without kernel symlink protection. Other
users in the system can shorten the “timer” logic of the checkonwin
script, though, by creating the file path at an arbitrary time.
6.2) Path /tmp/<user>_call_dropby
The script budgie_dropby.py creates this file as a trigger
for the dropover script which reacts to the creation of this path by
scanning the current list of USB block devices and their mount points in the
system. A GUI dialog is displayed or updated as a reaction to this.
A local attacker can cause this dialog to be displayed by creating this
file. It can also be used as a kind of local DoS vector to keep the
dropover script busy all the time, iterating over block devices.
6.3) Path /tmp/<user>_dropby_icon_copy
This is used as a trigger file in budgie_dropby.py. If the
file is created then a GUI dialog is changed and updated. In the
copy_flash Python script this trigger is created to signal
that some files have been copied.
A local attacker can cause this dialog to be displayed by creating this file at arbitrary times.
Upstream Fix
This is fixed in upstream commit e75c94a. The public /tmp
directory has been replaced by the user’s private $XDG_RUNTIME_DIR, with a
fallback to the user’s home directory.
7) Timeline
| 2023-10-16 | I reported the issues 1) - 4) to fossfreedom@ubuntu.com, offering coordinated disclosure. |
| 2023-10-17 | Upstream accepted coordinated disclosure aiming at a publication date towards the end of the year. |
| 2023-11-28 | Upstream communicated to us the CVEs they assigned for the issues plus for the two additional items 5) - 6) they discovered. They communicated that an upcoming version 1.7.1 will contain the fixes. |
| 2023-12-03 | Upstream communicated a preliminary publication date of 2023-12-14 for version 1.7.1 containing the fixes. They shared the individual patches for issues 1) - 6) with us. |
| 2023-11-14 | The publication date has been reached, the upstream version 1.7.1 as well as GitHub security advisories have been published. |
8) References
- budgie-extras GitHub repository
- budgie-extras v1.7.1 bugfix release
- budgie-extras v1.7.0 tag: this was the code based used in this review
- bugfix commit for window-shuffler application
- bugfix commit for the wpreviews application
- bugfix commit for the takeabreak application
- bugfix commit for the weathershow application
- bugfix commit for the clockworks application
- bugfix commit for the dropby application
Lanzado Kdenlive 23.08.4
El pasado lunes 11 de diciembre fue lanzado KDE Gear 23.08.4 una revisión del potente editor de video de KDE adpatado para todo tipo de usuarios, de noveles a expertos.
Lanzado Kdenlive 23.08.4

Hoy quiero comentar que ha sido lanzado Kdenlive 23.08.4, una nueva versiói del programa de montaje y edición de videos Open Source (código abierto) lanzado alrededor del año 2003. Kdenlive se cimenta sobre Qt y la infraestructura (framework) de librerías KDE. Gran parte de los procesamientos de video son efectuados a través de MLT Framework, que se basan a su vez en otros proyectos Open Source tales como FFmpeg, freOr, movit, padspa, sox, etc.
Kdenlive ha sido concebido para responder a las más diversas exigencias de montaje y edición, desde nivel básico hasta los más elaborados niveles de edición profesional. No obstante, está desarrollado por un pequeño grupo de personas y la incorporación de nuevos miembros al equipo será siempre muy bienvenida e invaluablemente apreciada.
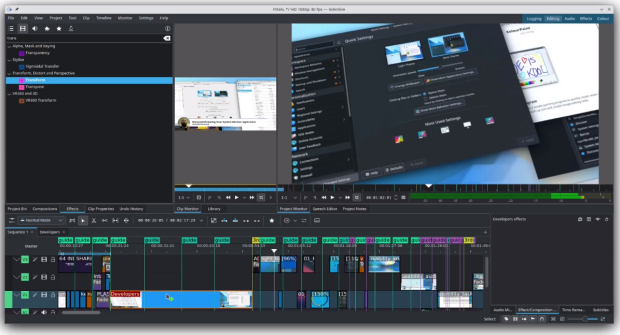
Este Kdenlive 23.08.4 incorpora una protección para trabajar con secuencias a velocidad de fotogramas variable y corrige problemas de reasignación de tiempo y subtitulado.
Además, también se recupera la compatibilidad con la exportación de vástagos de audio, que permite renderizar pistas de audio como archivos independientes. En caso de que te estés preguntando por qué no hay una versión principal 23.12 este mes, la comunidad KDE se está preparando para una mega versión que actualizará nuestra pila de software a los marcos Qt6 y KF6. Aunque se trata principalmente de cambios bajo el capó, significa tener una interfaz más moderna y estable con soporte mejorado de Wayland para los usuarios de Linux. Esta transición allana el camino para las próximas mejoras de rendimiento, como la integración de efectos de GPU.
Otros r
Más información: Kdenlive
Y, recuerda, todo este software es gratuito y sin publicidad en todos los sentidos: no te cuesta ni un euro y no se cobra en en forma de datos personales. No obstante, si quieres ayudar a su desarrollo siempre puedes participar en con donaciones.
La entrada Lanzado Kdenlive 23.08.4 se publicó primero en KDE Blog.

OWASP SP : Terceiro Virtual de 2023
Desafios e Empoderamento: Mulheres na Linha de Frente da Cibersegurança

O OWASP São Paulo Chapter está entusiasmado em anunciar mais um encontro virtual, focado em um tema crucial e inspirador: “Desafios e Empoderamento: Mulheres na Linha de Frente da Cibersegurança“. Este evento especial será marcado pela presença de três mulheres excepcionais que se destacam no cenário da cibersegurança: Eva Pereira, Paula Papis e Carolina Bozza.
O bate-papo será moderado pela Professora Ines Brosso e Patricia Sanches, e trará à tona temas relevantes de cibersegurança, será debatido também sobre os desafios extras que mulheres precisam enfrentar para entrar e crescer dentro da área de Segurança da Informação.
Acesse nossa pagina no LinkdIn para ver mais sobre os nossos convidados.
Este evento será um espaço inclusivo e esclarecedor, destacando não apenas a importância das mulheres na cibersegurança, mas também abordando desafios enfrentados por elas no campo profissional.
Este evento oferecerá uma oportunidade única para discutir, aprender e se inspirar com a experiência e a sabedoria dessas mulheres excepcionais na cibersegurança.
Marque em sua agenda e não perca esta oportunidade única de mergulhar no mundo da cibersegurança e do papel crucial que cada indivíduo desempenha na proteção dos dados e informações.
A transmissão será realizada ao vivo no canal do YouTube da OWASP São Paulo Chapter e pela nossa pagina do LinkedIn. Inscreva-se agora para receber atualizações e lembretes sobre este evento imperdível!
Fique ligado para mais detalhes e não deixe de participar deste diálogo fascinante sobre o fator humano na segurança digital. Nos vemos lá!

Curso de Vim: Consejos y trucos de Vimgrep
Al comenzar a utilizar Vim, quizás eches en falta un buscador propio de texto en archivos que tienen otros entornos de edición o editores. Para eso está Vimgrep

Quizás te vienen a la mente preguntas similares a: «¿Cómo podría buscar todos los archivos que contienen la palabra echo? ¿Cómo podría buscar la cadena de texto const solo en los archivos de extensión .js?»
Pues tengo buenas noticias para ti. Resulta que en Vim de hecho ya viene integrado un potente buscador en archivos listo para ser utilizado.
Hay dos manera de realizar búsquedas en archivos en Vim: :grep y :vimgrep. La primera utiliza el comando externo grep y la segunda es la propia herramienta que incluye Vim. En este artículo vamos a ver cómo utilizar el comando de Vim :vimgrep.
Este artículo es una nueva entrega del curso “improVIMsado” que desde hace meses vengo publicando en mi blog sobre el editor Vim y que puedes seguir en estos enlaces:
- https://victorhckinthefreeworld.com/tag/vim/
- https://victorhck.gitlab.io/comandos_vim/articulos.html
Y más recursos en la guía que he traducido al español para aprender Vim:
Este artículo es una traducción de un artículo en inglés escrito por Igor Iranto que tienes disponible en este enlace:
¿Por qué aprender el uso de Vimgrep?
La habilidad para realizar búsquedas de manera rápida y eficiente puede mejorar tu productividad.
Es cierto que para Vim hay disponibles un montón de complementos muy útiles que realizan la tarea de manera cómoda, algunos de esos complementos son ctrlp, denite o fzf.vim. Estos complementos son realmente muy buenas herramientas, entonces ¿por qué tengo que aprender a usar vimgrep?
Simplemente porque esta utilidad propia de Vim no sea reciente, no quiere decir que no sea buena. Hay unas cuantas ventajas al aprender a utilizar vimgrep.
La primera es que el comando :vimgrep está integrado en Vim, por lo que no tendrás que preocuparte de instalar dependencias, ni tener que lidiar con los problemas que a veces deriva de eso. Si alguna vez has tenido que utilizar un Vim sin los complementos a los que estás acostumbrado (por ejemplo si estás en una sesión SSH en un servidor remoto, o utilizando el equipo de otra persona o quizás desde un dispositivo móvil, etc) en esos casos puedes estar seguro que :vimgrep siempre estará allí instalado listo para ser usado.
Segundo, vimgrep utiliza el motor de expresiones regulares (regex) propio de Vim. Esto puede parecer un contra más que una ventaja para algunas personas, pero ya verás como cambias de opinión cuanto más uses Vim y vimgrep. Al utilizar el mismo motor de expresiones regulares que Vim, esto significa que no hay diferencias al utilizar la búsqueda de Vim (/) y al utilizar :vimgrep. Tu cerebro no tendrá que cambiar a un modo diferente. Cuanto menos tengas que utilizar tu materia gris para editar, más la podrás utilizar para cosas más divertidas e interesantes.
Pero vimgrep tiene algunas desventajas. La mayor es que al realizar búsquedas las carga todas en la memoria, por lo que si tienes un resultado grande de la búsqueda, esto puede ralentizar el uso de Vim. Sin embargo, si trabajas en proyectos de tamaño medios, es lo suficientemente potente.
Uso básico
El comando a utilizar sería :vimgrep pero en este artículo utilizaremos la opción corta que es :vim. Sí, ¡vim dentro de Vim!
El comando :vim se utiliza siguiendo la siguiente sintaxis:
:vim /patrón/indicador ruta
-
patrónes el patrón de tu búsqueda. -
indicadores un indicador que se le puede pasar al patrón de búsqueda. -
rutaes el argumento que indica donde buscar. Se le pueden pasar múltiples argumentos.
Bueno, visto lo básico, vamos a aprender con ejemplos a utilizar vimgrep.
Buscar una cadena de texto dentro de un archivo en particular
Si necesitas encontrar la cadena de texto «hola» dentro de todos los archivo de ruby con extensión .rb dentro de la carpeta app/controllers/ , ejecuta el siguiente comando:
:vim /hola/ app/controllers/**/*.rb
Utilizo mucho los comodines * y **.
El comodín, **, busca de manera recursiva, es decir dentro de por ejemplo estas carpetas: app/controllers/dir/, app/controllers/otro/dir/, app/controllers/archivo.
El comodín, *, reemplaza una cadena de cualquier longitud de caracteres. En este caso *.rb reemplaza a cualquier cadena de texto que termine con .rb (como hola_controller.rb, loquesea.rb).
Por cierto, no confundas los comodines con los asteriscos en las expresiones regulares. Son dos cosas diferentes. El patrón del asterisco en las expresiones regulares significa cero o más del patrón siguiente (por ejemplo: a* significa ninguna o más «a»), mientras que el comodín no necesita de un patrón a continuación (* significa cualquier cadena de texto de cualquier longitud).
El resultado de la búsqueda de :vim se mostrará en una ventana quickfix. Si no estás familiarizado con esto, por ahora piensa en ello como en un conjunto de elementos. En este caso en particular, en un conjunto de resultados de la búsqueda.
Después de ejecutar el comando de búsqueda, ejecuta el comando :copen para abrir la ventana quickfix.
Si no conoces esta ventana de Vim, para empezar a manejarte con ella, estos son los comandos de quickfix más útiles y que vamos a utilizar más a menudo:
:copen        Abre la ventana _quickfix_
:cclose       Cierra la ventana _quickfix_
:cnext        Va a la ubicación siguiente
:cprevious    Va a la ubicación previa
Es una explicación muy básica, pero suficiente para aprender lo básico sin perder el hilo de vimgrep. Para aprender más sobre quickfix puedes usar la ayuda de Vim, escribiendo :h quickfix.
Buscar una cadena de texto dentro de una extensión particular de archivo
Si necesitas buscar la cadena «echo» pero solo dentro de los archivos con extensión .sh:
:vim /echo/ **sh
El comodín anterior del doble asterisco puede resultar muy útil a la hora de buscar dentro de una estructura de archivos anidada. Al utilizar ** encontrará la coincidencia tanto en ./un_archivo.sh como en ./una/ruta/muy/larga/hasta/el_archivo.sh.
Si solo quieres buscar en archivos que estén en la misma carpeta (como ./hey.sh o ./un_rchivo.sh, pero no en ./una/ruta/muy/larga/hasta/el_archivo.sh), en vez de usar el comodín del doble asterisco, utiliza el asterisco simple *sh.
Buscar una cadena de texto dentro de archivos que terminan con una extensión en particular
Si necesitas buscar la cadena de texto «echo» pero solo dentro de los archivos que acaben en .sh o en .rb:
:vim /echo/ **{sh,rb}
Pasar múltiples archivos dentro de los que buscar
Recuerda que al principio comenté que vimgrep acepta múltiple argumentos en los archivos. Hasta ahora solo hemos estado utilizando un argumento. Sin embargo, podemos pasarle más de un argumento.
Si necesitas buscar la cadena «echo» dentro de .sh o .rb:
:vim /echo/ **sh **rb
Si necesitas buscar la cadena «echo» dentro de app/controllers/ o Rakefile:
:vim /echo/ app/controllers/** Rakefile
No estás limitado a solo dos argumentos de archivos, puedes pasarle al comando tantos argumentos como desees. Si necesitas buscar «echo» dentro del directorio app/controllers/ , en Rakefile en el directorio actual, en el archivo .json en el directorio actual y en el archivo sh dentro de alguna parte del directorio bin/ de tu sistema:
:vim /echo/ app/controllers/** Rakefile *.json bin/**/*sh
Encontrar múltiples coincidencias en la misma línea del archivo
Cuando ejecutamos :vim /echo/ app/controllers/**, Vim mostró la primera coincidencia del texto de cada línea del texto que encontró.
Esto significa que si tenemos una línea que contiene la palabra buscada varias veces, como echo "me gusta el echo echo echo", el resultado de la búsqueda solo mostrará un resultado en vez de cuatro. Al utilizar el patrón /echo/ este solo busca la primera coincidencia del patrón en esa línea.
¿Qué pasa si queremos que nuestra búsqueda muestre en los resultados las cuatro coincidencias dentro de la misma línea?
Para encontrar todas las cadenas de texto de «echo» aunque estén varias en la misma línea, necesitamos utilizar y añadir el indicador global g, el mismo que utilizamos al realizar las búsquedas dentro del texto con /.
:vim /echo/g app/controllers/**
Ahora encontrará todas las coincidencias de la cadena de texto buscada.
Es muy normal añadir este indicador a las búsquedas para que realice una búsqueda completa.
Búsqueda difusa de una cadena dentro de un archivo en particular
Vimgrep también es capaz de realizar una búsqueda difusa. Solo debemos pasarle el indicador f. Para realizar una búsqueda difusa de la cadena «echo» dentro de un archivo .sh utilizaremos lo siguiente:
:vim /echo/fg **sh
Esto buscará de manera difusa el patrón dentro de **sh y mostrará todas las que se parezcan a «echo».
¿En qué se diferencia la búsqueda difusa de vimgrep de una búsqueda normal? Además de encontrar la cadena de texto literal «echo», también encontraría algo similar a: puts "Checking Homebrew..." porque la cadena de texto «ec» en «Checking» y «Ho» en «Homebrew» forman la cadena que buscamos «echo».
Buscar un patrón de una expresión regular en un archivo en particular
Vimgrep permite el uso de expresiones regulares en el patrón del término a buscar. Si quieres buscar tanto «echo» o «ecko» dentro de un archivo de extensión .sh :
:vim /ec[hk]o/g **sh
El [] en [hk] es un caracter que marca la sintaxis. En este caso encontrará la palabra que contenga tanto «h» como «k».
Si necesitas buscar un texto que esté entre comillas simples (como 'hello', o 'foo', o '1234') dentro de un archivo .sh:
:vim /'[^']*'/g **sh
Este es un pequeño ejemplo de lo que se puede conseguir utilizando las expresiones regulares en Vim.
Buscar una cadena de texto dentro de un directorio en particular
El comodín de doble asterisco ** o el comodín simple pueden usarse poniéndolo al principio, en el medio o al final de la ruta que queremos. También puede utilizarse varias veces en el patrón del archivo.
Si quieres buscar «echo» dentro del directorio /controllers/:
:vim /echo/g **/controllers/**
Si quieres buscar «echo» dentro del directorio /controllers/ y a su vez dentro de un archivo que empieza por «shipment» y termina con «rb» (por ejemplo: shipment_domestic.rb, shipment_incoming.rb):
:vim /echo/g **/controllers/**/shipment*rb
Buscar una cadena de texto dentro de un directorio diferente al directorio actual de trabajo
Vimgrep busca dentro de tu directorio de trabajo. Pero si necesitas buscar la cadena de texto «echo» ¿cómo lo harías? Fácil. Simplemente muévete a otro directorio y realiza allí la búsqueda.
Vim tiene un comando :cd que cambia de directorio en el que estás actualmente.
:cd otro/directorio
:vim /echo/g **js
Cuando termines, simplemente vuelve con :cd al directorio previo.
Buscar en el archivo actual
Puedes utilizar el atajo de Vim en el patrón de búsqueda. En Vim % representa el buffer actual activo, es decir, el archivo en el que actualmente te encuentras.
Si necesitas buscar «echo» en el archivo actual:
:vim /echo/g %
Puedes leer más sobre este atajo en la ayuda de Vim: :help :\_%
Utilizar otros comandos de búsquedas
En ocasiones necesitamos realizar una búsqueda más avanzada. Y puede que necesitemos complementar la búsqueda utilizando otros comando, como por ejemplo find. No hay ningún problema. Para buscar el texto «echo» dentro de todos los archivos cuyos nombres comiencen con «docker» utilizando el comando find:
:vim /echo/g `find . -type f -name 'docker*'
Si necesitas saber más de cómo funciona el comando find, echa un vistazo a la ayuda del comando con man find en tu terminal.
El comando git ls-files es otra útil herramienta para búsquedas relacionadas con git. Vamos a asumir que estás dentro de un repositorio git, para buscar el texto «echo» dentro únicamente de los archivos modificados, puedes ejecutar lo siguiente:
:vim /echo/g `git ls-files --modified`
Más información de cómo funciona git ls-files la tienes disponible en su página de ayuda en la terminal man git-ls-files.
Buscar en archivos dentro de Arglist
La lista de argumentos (arglist) es una funcionalidad de Vim en la que Vim almacena una lista de archivos.
¿Qué es eso de la arglist? Si abre en Vim varios archivos, por ejemplo vim archivo1.js archivo2.rb archivo3.py), Vim almacena estos archivos dentro de una lista que se llama arglist. Para verlos, ejecuta :args.
No es necesario que la lista arglist se llene al inicio de Vim. Puedes crear tu propia lista arglist mientras estás ejecutando Vim mediante :args archivo1.js archivo2.rb archivo3.py. Para ver los archivos, ejecuta en Vim :args.
Cuando ya tienes tu lista de archivos, puedes cambiar rápidamente al siguiente o regresar al archivo anterior mediante los comando :next o :prev respectivamente.
Vale, arglist es una colección de archivos, pero ¿qué tiene esto que ver con vimgrep?
Por lo general, al realizar una tarea, primero debes reunir todos los archivos relevantes. Cuando ya tienes todos los archivos relevantes en una colección, puedes navegar rápidamente entre ellos. Arglist es una buena opción para crear esa lista de archivos.
De la misma manera que antes hemos visto que Vim representa al archivo actual con %, también Vim tiene una representación para la lista de archivos arglist y es ##.
Así que si queremos buscar dentro de una lista arglist de archivos la cadena de texto «echo» ejecutaríamos lo siguiente:
:vim /echo/g ##
¿Por qué esto es útil? Puede parecer que estoy añadiendo un paso extra en el proceso de búsqueda: primero, necesito crear la lista de archivos arglist y segundo, ejecuto el comando vimgrep. ¿Por qué no puedo ejecutar simplemente :vim /echo/g archivo1.js archivo2.rb archivo3.py y realizar todo en un único paso?
Hablando desde mi propia experiencia, a menudo me encuentro realizando múltiples búsquedas de distintos términos en un conjunto fijo de archivos con los que normalmente estoy trabajando, como por ejemplo:
:vim /echo1/g archivo1.js archivo2.rb archivo3.py
:vim /foo2/g archivo1.js archivo2.rb archivo3.py
:vim /bar3/g archivo1.js archivo2.rb archivo3.py
Por lo tanto, encuentro que es muy molesto tener que escribir una y otra vez el mismo conjunto de archivos cada vez que quiera hacer una búsqueda en ellos. ¡Aquí es donde arglist puede ahorrarme un montón de tiempo!
Por qué no crear la lista de archivos arglist primero:
:arglist archivo1.js archivo2.rb archivo3.py
¿Y después reutilizarla en las siguiente búsquedas de vimgrep que realice?
Ahora ya simplemente necesito ejecutar:
:vim /echo1/g ##
:vim /foo2/g ##
:vim /bar3/g ##
En Vim puedes completar la información sobre cómo funciona ## con :h :_##. Y también saber más sobre la lista arglist mediante :h :arglist.
Repetir el último patrón de búsqueda
A veces necesito buscar un patrón complicado. Antes de buscarlo con el comando :vim me gusta probar si ese patrón se ajusta a lo que necesito probándolo con la búsqueda normal de Vim mediante el comando /.
Por ejemplo, si quieres buscar una cadena de texto rodeada por comillas simples, y a la vez excluir las propias comillas simples, puedes ejecutar '\zs[^']*\ze'. Pero este patrón de búsqueda no es muy intuitivo y puede que no des a la primera con el patrón de búsqueda que quieres. Al buscar algo así o más de complicado, primero me gusta probar que hace lo que creo que hace, por eso antes de ejecutar :vim /'\zs[^']*\ze'/g **sh, normalmente hago una búsqueda rápida con el comando de buscar /'\zs[^']*\ze' para probar si funciona.
Cuando confirmo que el patrón es lo que necesito, entonces lo ejecuto con el comando :vim. ¿Pero de verdad quiero volver a escribir '\zs[^']*\ze' de nuevo, con la probabilidad que hay de que me equivoque? Con todos esos símbolos, corchetes, etc…
Y peor si mi patrón de búsqueda es más complicado, como por ejemplo \(["']\)\(\%(\1\@!.\)*\)\1. Seguro que no me voy a acordar de todo y algún error cometeré.
Afortunadamente, existe un truco que te permite pegar el comando de búsqueda utilizado recientemente. Después de escribir :vim /, escribe Ctrl-r y después /. El secreto es que Ctrl-r cuando es utilizado en el modo de insertar o en este caso en el modo de línea de comandos, invoca los registros de Vim. Y aquí le pedimos a Vim el valor del registro de búsqueda /.
Ya que tanto el comando :vim como el comando de búsqueda / en Vim utilizan la misma forma para escribir las expresiones regulares, ambas búsquedas son compatibles, lo que no ocurriría si utilizáramos :grep.
Aunque en rendimiento :grep es más rápido, si la velocidad no es un problema (y no es reseñable en la mayoría de casos), :vim ofrece una mejor experiencia de uso.
Utilizar vimgrep de la manera más inteligente
Este es un buen momento para detenernos, ya que has aprendido unos cuantos trucos sobre :vim y son una buena muestra de lo que puedes conseguir con esta herramienta a la hora de editar texto en Vim. Pero no leas todo esto y lo olvides.
Tómate tu tiempo para ahondar en cada comando y probando cosas que necesitarás en tu día a día o que alguna vez has necesitado y no sabías cómo conseguirlo. Desmenuza los ejemplos, crea los tuyos, comete errores y entiéndelos.
Hasta que seas capaz de realizar tus búsquedas con :vimgrep sin necesidad de pensar y sin esfuerzo. Aunque hay muchas otras cosas que aprender sobre el comando, no dejes de aprender si te apasiona.


Canned Responses and Moderator Decisions
alpでfirewalldをpodmanで動かしてみる
ALP (Adaptive Linux Platform)は、SUSEとopenSUSEで開発している次世代OSのベースです。イミュータブルで軽量な仕様となっています。
この冬発売のGeeko MagazineにインストールとCockpitというブラウザから管理できるアプリの体験記を書いていますので、ぜひ皆さん試してみてください。
さて、今日は公式ドキュメントにある、firewolldをpodmanで動かす手順をやってみようと思います。
まず、alpにログインし、alp用のfirewalldのコンテナを特定します。
# podman search firewalldそうすると、ドキュメントにも乗っているalp用ワークロードが搭載された registry.opensuse.org/suse/alp/workloads/tumbleweed_images/suse/alp/workloads/firewalld のイメージが見つかります。
次に、手順の通り、alpからパッケージとしてのfirewalldを削除します。alpはイミュータブルなため、通常のzypperコマンドではなく、専用のtransactional-updateコマンドで暫定的な削除を行い、リブートすることでそれがシステムに適用されます。
# transactional-update pkg remove firewalld
# reboot
では、イメージのワークロードを実行します。
# podman container runlabel install \
registry.opensuse.org/suse/alp/workloads/tumbleweed_images/suse/alp/workloads/firewalld
他のイメージの実行時にも触れましたが、podmanは実行コマンドにラベルを貼ることができ、runlabel コマンドでそのラベルを指定して実行することができます。一連のalpワークロード用イメージは、installといったラベルにホストの設定などの処理を持たせています。
ドキュメントによると、firewalldはpolkitやsystemdなどの準備をしてくれているようです。
そう言えば、冒頭にdbusとpolkitの設定ファイルが必要、と書いてあったのですが、特に用意はせず、、、さて、どうなるでしょうか。
インストールが終わったので実行します。
# podman container runlabel run \
registry.opensuse.org/suse/alp/workloads/tumbleweed_images/suse/alp/workloads/firewalld
コンテナが実行されました。ではコンテナ経由でfirewall-cmdを実行してみます。
# podman exec firewalld firewall-cmd --list-all-zonesすると、zoneが表示され、firewall-cmdが実行可能なことがわかりました。
なお、firewalldのコンテナはホストを制御する関係上、privilegedで動いています。また、podmanを使っている場合、systemdとも統合されていて、systemctlコマンドで制御することが可能です。例えば、コンテナの起動は以下のコマンドで代替できます。
# systemctl start firewalldなお、firewalldやfirewall-cmdのマニュアルをコンテナ経由で見る方法もドキュメントに書かれていました。
firewalldならば、
# podman run -i --rm \
registry.opensuse.org/suse/alp/workloads/tumbleweed_images/suse/alp/workloads/firewalld \
man firewalld
firewall-cmdならば、
# podman run -i --rm \
registry.opensuse.org/suse/alp/workloads/tumbleweed_images/suse/alp/workloads/firewalld \
man firewall-cmd
で参照可能です。 manコマンドをコンテナの中で呼び出しているわけですね。
個人的に、firewalldをコンテナで実行する利点欠点が見えていない所があり、そのあたりも追って調査考察してみたいと思います。
Music of the week: the church organ
One of my favorite instruments is the church organ. A few weeks ago we already listened to organ and drums, but those were just covers of some popular songs. However, the church organ is also used in original music, including some really well-known songs.

Next to Bach, probably the best-known appearance of a church organ is in Andrew Lloyd Webber’s The Phantom of the Opera. As a kid, first, I copied it from vinyl to tape, after which I also bought it on CD. It was one of the very few CDs I ever sold from my collection: after a while, I started listening almost purely to instrumental music, and it did not fit that world… But, as a high school student I still listened to it a lot – at close to maximum volume :-)
TIDAL: https://listen.tidal.com/album/619259/track/619270
Talking about instrumental music. When I first visited my favorite CD shop, I was asked what kind of music I liked. When I told them I listened mostly to instrumental, I was told I was missing out on the really good part. But I also got some fantastic recommendations, one of which was the album “The Eight Wives Of Henry VI” by Rick Wakeman (did I mess up the numbers again?). It is one of my most listened to albums of all time. I have it on CD, and now also as high resolution FLAC files from HDtracks.
TIDAL: https://listen.tidal.com/album/40992779
Finally, one of my recent discoveries: music by Gary Ginsberg and Vitalij Kuprij. All songs have piano in them, and some even the church organ. Unfortunately, while it is available on YouTube and TIDAL, I could not find a CD version or downloadable FLAC files.
TIDAL: https://listen.tidal.com/album/104821378
As much as I like the church organ, there isn’t much contemporary music featuring it. A few more songs by Rick Wakeman,Gary Ginsberg, and Vitalij Kuprij. If you know any others, let me know! You can reach me on Twitter / Mastodon / etc., the links are in the upper right corner of my blog.