
 Member
 baltolkien
Novedades variadas de KDE Gear 21.12
Finalizando las serie de las novedades del lanzamiento masivo de actualizaciones de las aplicaciones KDE hoy os traigo las novedades variadas de KDE Gear 21.12, que cierra el ciclo de los artículos dedicados a Dolphin, Spectacle, Kdenlive, Konsole, Elisa y Gewnview de días anteriores.
Novedades variadas de KDE Gear 21.12
Como viene siendo habitual la demostración de que los desarrolladores de la Comunidad KDE siguen mostrando al mundo que tienen claro su objetivo no es otro que ofrecer los mejor del Software Libre para todos de forma continua, constante y sin cambios revolucionarios.
De esta forma cada 4 meses se dedican a acumular pequeñas mejoras en sus aplicaciones que suelen ser publicadas de forma conjunta en lo que ellos denominan KDE Gear.
A lo largo de una semana he ido publicando las novedades de algunas aplicaciones que han recibido mucho amor a lo largo del final del verano y todo el otoño, y ahora es el momento de describir las novedades de otras aplicaciones que han recibido menos pero que no son menos importantes:
- KDE Connect, la aplicación que convierte tu móvil en una extensión de tu escritorio y viceversa, nos permite ahora enviar mensajes con solo pulsar Intro (si desea añadir una nueva línea al mensaje, pulse Mayúsculas + Intro).

- KDE Itinerary, nuestro asistente de viaje digital al que le debo una entrada, viene con una interfaz de usuario mejorada que tiene en cuenta los certificados sanitarios del COVID 19 y los datos de vacunación. También muestra los nombres de los países que ha visitado, así como las fechas de sus viajes.
- La killer app de muchos desarrolladores, Kate (editor de texto avanzado de KDE) nos permite ahora abrir múltiples pestañas en las vistas de la terminal integrada. El complemento de integración para Git le permite borrar ramas e implementa sesiones de forma predeterminada, lo que significa que todos sus datos específicos de una sesión (documentos abiertos, diseños, etc.) se recuerdan automáticamente de forma predeterminada.
- KolourPaint, el sencillo programa de dibujo, ha obtenido una mejora visual que le proporciona un aspecto más fresco.

- Kontact, la suite de PIM que nos permite la gestión de todos sus calendarios, contactos y mensajes de correo, ha simplificado la configuración de recursos y de colecciones (como las carpetas de correo). De esta forma, los usuarios de Outlook apreciarán el aumento de estabilidad al acceder a sus cuentas.
- Akregator es el lector de fuentes de noticias de KDE; la nueva versión le permite buscar artículos ya leídos y facilita el proceso de actualización de las fuentes.
- Skanlite, una aplicación para escanear documentos e imágenes, nos permite escanear directamente a un PDF de una única página y recuerda el último escáner y formato de imagen usados al guardar en un archivo.
- Filelight, la aplicación que nos permite ver un claro gráfico del estado de sus dispositivos de almacenamiento, usa un algoritmo multihilo de escaneado del sistema de archivos en la versión 21.12, haciendo que sea sustancialmente más rápido el examen de todos los archivos y carpetas.

- Konqueror, el clásico explorador de archivos y navegador web de KDE, muestra ahora más información sobre los errores de certificados.
- KCalc, la calculadora de KDE para el escritorio Plasma y el móvil, viene con una nueva función que muestra un visor del historial de todos los cálculos recientes.
Más información: KDE Gear 21.12
Procno: un monitor de procesos para Linux
Procno es un monitor de procesos de nuestro sistema GNU/Linux con la posibilidad de reenvío de notificaciones de Freedesktop. Como «top», pero con una interfaz gráfica distinta

Procno es una aplicación escrita en Python y publicada bajo licencia GPL3 con la que en una ventana gráfica podremos visualizar el estado de los procesos de nuestros sistemas GNU/Linux de una manera distinta.
Hace unos días conocí esta aplicación por un post (en inglés) en el foro de openSUSE, donde su desarrollador, Michael Hamilton, compartía el enlace.
El código está alojado en un repositorio de GitHub, y aunque hay un paquete de software disponible para openSUSE, para ejecutarlo basta con descargar el script en Python y ejecutarlo en nuestra máquina si cumple con las dependencias necesarias. Para ello ejecuta:
wget https://raw.githubusercontent.com/digitaltrails/procno/master/procno.py
python3 procno.py
Aunque es probable que todas las dependencias que requiere estén disponibles en cualquier distribución de GNU/Linux moderna, y son:
- python 3.8
- python 3.8 QtPy
- python 3.8 psutils
- python 3.8 dbus
- Freedesktop theme icons
Al ejecutar el script se nos abrirá una ventana llena de puntos. ¿Qué es cada cosa?
- Todos los procesos del sistema están representados por puntos.
- La coloración estática de puntos es específica del propietario del proceso (todos los procesos de color gris claro pertenecen a root).
- Si un proceso consume un poco de CPU (<10%), su punto se iluminará brevemente en azul.
- Si un proceso consume una gran cantidad de CPU, su punto variará de un rojo rosado más claro a un rojo completo, dependiendo de la cantidad de CPU que esté consumiendo.
- Cada punto de proceso se aumenta con un anillo discontinuo que indica el tamaño del conjunto residente del proceso como proporción de RAM.
- Si se ingresa texto en el campo de búsqueda (por ejemplo, nmb), cualquier proceso con texto coincidente se rodea en un círculo (esto ocurre dinámicamente, por lo que los nuevos procesos coincidentes aparecerán encerrados en un círculo cuando comiencen). La búsqueda de texto se vuelve incremental una vez que se han ingresado más de tres caracteres.
- Al pasar el cursor sobre un punto, aparece una información sobre herramientas que contiene los detalles del proceso.
- Al hacer clic en un punto, aparece un pequeño cuadro de diálogo con detalles procesados que se actualizan dinámicamente. El diálogo incluye un interruptor (una casilla de verificación) que activa un menú desplegable de señal que se puede usar para señalar/terminar el proceso.
- Si un proceso consume demasiada CPU o RSS durante demasiado tiempo, se generará una notificación en el escritorio. La notificación continuará actualizándose mientras el proceso continúe siendo ofensivo. Si la notificación está cerrada, no se generarán más notificaciones mientras el proceso continúe siendo ofensivo. Cuando un procesado deja de consumir tanto, su estado de notificación se restablece, cualquier infracción posterior dará lugar a nuevas notificaciones.
- Procno, opcionalmente, se puede ejecutar sin la bandeja del sistema. La geometría y la configuración se conservan en los reinicios.
- Procno se ajusta dinámicamente a temas de escritorio claros y oscuros.
Además de todo esto, en la parte superior de la ventana tenemos varios botones para gestionar la aplicación.
- Podremos detenerla o volverla a activar.
- Nos permitirá activar o desactivar las notificaciones de escritorio.
- Un cuadro de búsqueda para buscar procesos por nombre.
- Ayuda sobre la aplicación.
- Información sobre la aplicación y su autor.
- Un menú donde tendremos todo esto y un apartado para la configuración de la aplicación.
En los ajustes podremos configurar no solo el comportamiento de la aplicación, también los colores de los puntos que representan los procesos de nuestro sistema.
Y una de las opciones de los ajustes es representar los puntos en forma de «árbol de navidad» (tree enabled), lo que para estas fechas puede resultar apropiado, junto con esos colores que se encienden y apagan…
El software está abierto a mejoras y el autor admite opiniones sobre el software para mejorarlo.
Pruébalo en tu equipo con tu distribución de GNU/Linux y aporta tu opinión o tus mejoras de código al desarrollador.
O simplemente disfruta de una manera diferente de ver y monitorizar los procesos que se están ejecutando en tu sistema GNU/Linux de una manera distinta. ¿te gusta?
Creating an endless loop using MQTT and syslog-ng
Version 3.35.1 of syslog-ng introduced an MQTT source. Just for some fun in the last syslog-ng blog post of the year, I created an endless loop using syslog-ng and the Mosquitto MQTT broker. Of course, it does not have much practical value other than possibly a bit of stress testing, but hopefully provides a fun introduction to MQTT-related technologies in syslog-ng.
Read my blog at https://www.syslog-ng.com/community/b/blog/posts/creating-an-endless-loop-using-mqtt-and-syslog-ng
syslog-ng logo
Novedades de Gwenview para KDE Gear 21.12
Esta semana pre-navideña estoy comentando todas loas novedades del lanzamiento masivo de actualizaciones de las aplicaciones KDE, la demostración constante de que los desarrolladores de la Comunidad KDE siguen mostrando al mundo que tienen claro su objetivo, que no es otro que ofrecer los mejor del Software Libre para todos de forma continua, constante y sin cambios revolucionarios. Y como siempre estoy dedicando algunos artículos a repasar las buenas nuevas, así que hoy toca hablar de las novedades de Gwenview para KDE Gear 21.12, siguiendo la estela de las novedades de Dolphin, de Spectacle, Kdenlive, Konsole y Elisa de días anteriores.
Novedades de Gwenview para KDE Gear 21.12

El ecosistema de aplicaciones de la Comunidad KDE está bien surtido. Tenemos de todo tipo: ligeras, potentes, rápidas, profesionales, etc.
No obstante, una de las más utilizadas es Gwnview ya que combina rapidez con funcionalidades de forma muy efectiva.
Y, como no puede ser de otra manera, Gwenview no para de mejorar gracias al trabajo constante de los desarrolladores de la Comunidad KDE. De esta forma en este KDE Gear 21.12, esta aplicación nos ofrece las siguientes novedades (extraídas del changelog):
- Al cambiar el tamaño de una imagen la aplicación nos dirá cuánto espacio ocupará la imagen en el disco duro antes incluso de aplicar los cambios.
- Establecimiento de forma automática del sentido de impresión de una imagen.
- Ahora nos permite escribir un nivel de zoom en el combo de zoom.
- Eliminados los antiguos iconos de aplicaciones y acciones.
- Elimnado el cambio al modo de navegación pulsando Esc mientras la ventana emergente está visible.
Además, se han corregido decenas de bugs. El visor simple por defecto pero potente cuando se necesario sigue mejorando.
Más información: KDE Gear 21.12
Curso de Vim: corregir texto en el modo insertar mientras escribimos
Veamos algunos atajos de teclado para corregir texto mientras estamos escribiendo en el modo insertar en el editor Vim

En ocasiones puede ser necesario borrar algunos caracteres mientras escribimos en Vim en el modo insertar sin necesidad de salir del modo e ingresar en el modo normal.
Sí, funcionan las teclas normales de borrado de texto o suprimir, o el borrado con «backspace», pero Vim, tiene sus propios atajos de teclado, veamos algunos.
Este artículo es una nueva entrega del curso “improVIMsado” que desde hace meses vengo publicando en mi blog sobre el editor Vim y que puedes seguir en estos enlaces:
- https://victorhckinthefreeworld.com/tag/vim/
- https://victorhck.gitlab.io/comandos_vim/articulos.html
Y para aprender Vim (de la manera más inteligente) aquí tienes esta útil guía:
Vamos a echar un vistazo a algunas opciones. Si estamos en el modo insertar escribiendo, podemos pulsar el atajo de teclado:
- Ctrl+h → para eliminar el caracter justo anterior al cursor (similar al «backspace»)
- Ctrl+w → para eliminar la palabra justo anterior al cursor
- Ctrl+u → para eliminar desde la posición del cursor hasta el comienzo de la línea o hasta el comienzo de donde hayamos empezado a insertar texto.
Por cierto si estando en el modo insertar queremos pegar un texto que hemos copiado dentro de Vim, no hace falta salir del modo y entrar en el modo normal para pegarlo con p.
Estando en el modo insertar podemos pegar ese texto en la posición del cursor mediante Ctrl-r 0
Y ya para acabar, un comando que también nos puede resultar útil. Si estos comandos que he apuntado se nos quedan cortas y queremos ejecutar cualquier comando del modo normal mientras estemos en el modo insertar, podemos hacerlo con Ctrl+o
Estando en el modo insertar, si pulsamos Ctrl-o seguidamente podremos ejecutar un comando del modo normal y seguir usando después el modo insertar introduciendo texto.
¿Conoces algún otro comando interesante similar que utilices? Compártelo en los comentarios.


openSUSE Board Election 2021 happening right now
The election was announced on the project mailing list on the 1st of November 2021. The current Election Committee is composed of Ariez Vachha, Mohammad Edwin Zakaria and myself.
This election is required to fill two seats on the openSUSE Board, as the term for Simon Lees and Vinzenz Vietzke are coming to an end.
To learn more about openSUSE membership, check out this wiki.

As the initial nominations/applications phase ended, we had only two members who expressed to run for this election. They are:
• Attila Pinter
• Maurizio Galli
Since, we had only two candidates for two available seats, we extended the nominations/applications phase for another two weeks, giving other members the chance to toss the names of people who'd they wish to nominate. However, even after the two weeks, we were still left with only two candidates and therefore, as per the election rule about insufficient nominations, we started the election and each candidate is required to obtain 50% of votes to be considered a winner.
The ballots were opened on the 13th of December and openSUSE members received their voting URL/credentials by email. They can vote until the 30th of December at 23h59 UTC. Ballots will close on 31st December at midnight and a few hours later the result will be announced.

Orient Cruise: Dubai
I dedicate this text to Vincent and Sara. :wave: If we cannot share the experience, so let me share at least the story.
Prologue
Also in 2021, holiday plans fell victim to yet another Covid-19 wave. Eventually, I waited until mid December and booked in face of the next emerging Covid-19 variant Omicron the least adventures holidays of my adulthood: a week-long all-inclusive cruise in the Orient with every aspect handled in due care by a world-class global-scale tour operator.
For the sake of completeness, let me quickly recap the outbound connection to the destination. I got a Rail&Fly ticket to a nearby airport in Germany. The Airbus A380 to Dubai, a huge airplane with two floors, was approximately occupied 30%, maybe less. I use Atmosfair.de for CO2 compensation. Not sure who would need to pay for all those empty seats around me. The time difference between Germany and Dubai is 3 hours. I arrive after about 6 hours of flight and a short sleep of about 3 hours at 6 o’clock in the morning. On top of mandatory PCR tests to get on the flight, it seems that Dubai tests just again all tourists upon arrival. No need to wait for the result – it is delivered about 3 hours later to you via SMS. I wonder what happens in the case of a positive test. I didn’t find out as my test was fortunately negative. 😁
The tour operator takes care of the transfer to the cruise ship. They also handle all subsequent paper work to enter the destination countries, that means here the United Arabic Emirates (UAE) and Oman. For this purpose, they require all passengers to hand over their passports before getting on board of the ship. After some hesitation and some questioning, I resign and hand out my passport, too.
Once on board of the ship, I drop off my luggage, eat something and head out to explore Dubai on my own.
Dubai: Everything is also a Shopping Mall
I have made no efforts to prepare my first day in Dubai. I only downloaded a city map. The cruise ship harbour of Dubai is a 30 min car ride from the lively city centre. So I join two other passengers, who happen to know Dubai very well, for a shared taxi ride to their destination, the Dubai Mall. I am amazed by all those skyscrappers on the way. Every street is a high way with 3 lanes minimum it seems.

Taxi ride from the harbour to the Dubai Mall. On the left side, you can see the aerial railway with its futuristic railway station (open in large).
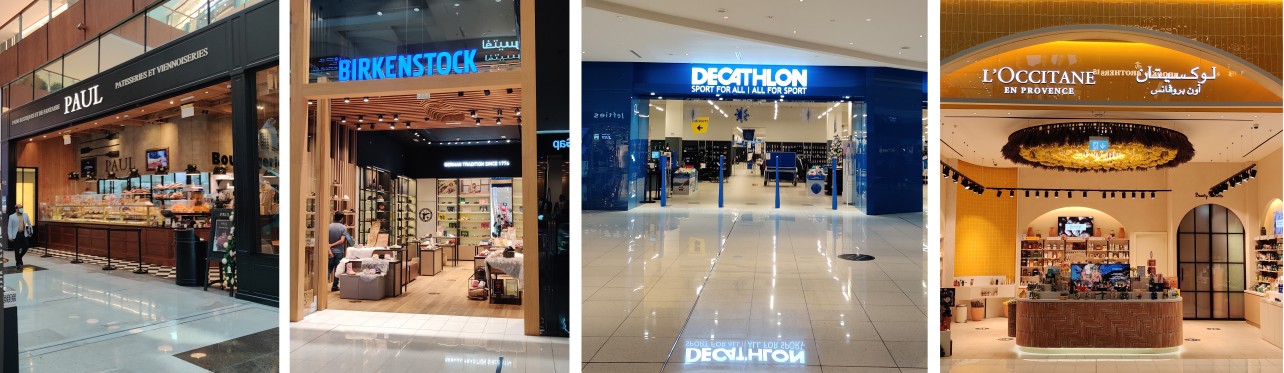
Before the other passengers leave, they point me to the famous aquarium in the mall. The aquarium spans several floors and is indeed impressive. Otherwise, the mall has everything you expect: fashion store H&M, bakery PAUL, L’Occitane en Provence, Birkenstock, Decathlon, the best of the best!
I consider to buy a camera lens for landscape photography. I find an electronics store, who got one for 1500€. Now, the deal I found earlier in the Internet to rent this lens for 100€ per week appears under a totally different, much better light. So I head towards the rental office in the South of Dubai. Long tubes hanging 6 meters over the highways bring you from the mall to the metro. The metro is in fact an aerial railway. And it is packed. The people seem to be from all over the world – later I learn that Dubai has about 80% immigrants.
The photography rental shop is in the 8th floor of a skyscraper. Fortunately, they still have the lens in stock. Unfortunately, I cannot get it, because they ask as a deposit for a) my passport, b) amount blocked with a local credit card, or c) 1200€ cash in local currency. The tour operator has my passport, I don’t have a local credit card and feel uneasy to withdraw and hand in 1500€ in cash. I am frustrated. 😩 I envy all those people who have spare passports due to their second nationality. People ask me sometimes why I wanted to become also a French citizen. I just got one argument more. I decide to find another store that possibly rents lenses. I end up in the Dubai Marina Mall and buy eventually for about 280€ an entry-level lens.1
On my way out, I discover a city e-bike self-rental station. I quickly sign up for a day plan (4€) and cycle to the Dubai Marina. I make a lot of photos.
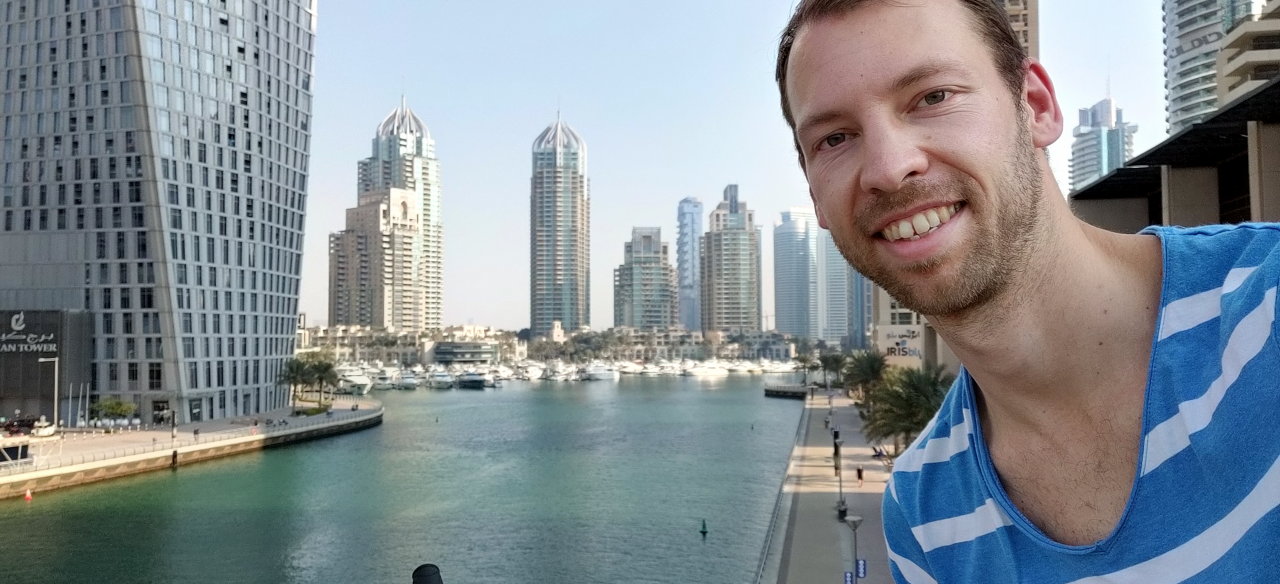
Selfie at the Dubai Marina (open in large).
Then, I head towards the artificial lagoon The Palm Jumeirah. Unfortunately, I am on the wrong way of the highway and after half an hour to find a path I realise that there seems to be just no way to cross it with a bike. It happened again two more times later that day.
Eventually, I give up the search and get on the Monorail panorama train to access The Palm. The third stop is integrated in, guess what, the Nakheel Mall. The Mall features a hotel with a restaurant on the top called The View. The ticket for the lift after 4:00 PM (sunset time) is 40% more. It is now 4:03 PM. ![]() I decide to keep it for next time (:wave: Vincent, Sara), hop on the Monorail, and get to the next stop: Atlantis Aquaventure. It turns out, the part freely accessible is mostly a mall. Again! They have also an aquapark and a hotel and Dolphins.
I decide to keep it for next time (:wave: Vincent, Sara), hop on the Monorail, and get to the next stop: Atlantis Aquaventure. It turns out, the part freely accessible is mostly a mall. Again! They have also an aquapark and a hotel and Dolphins.
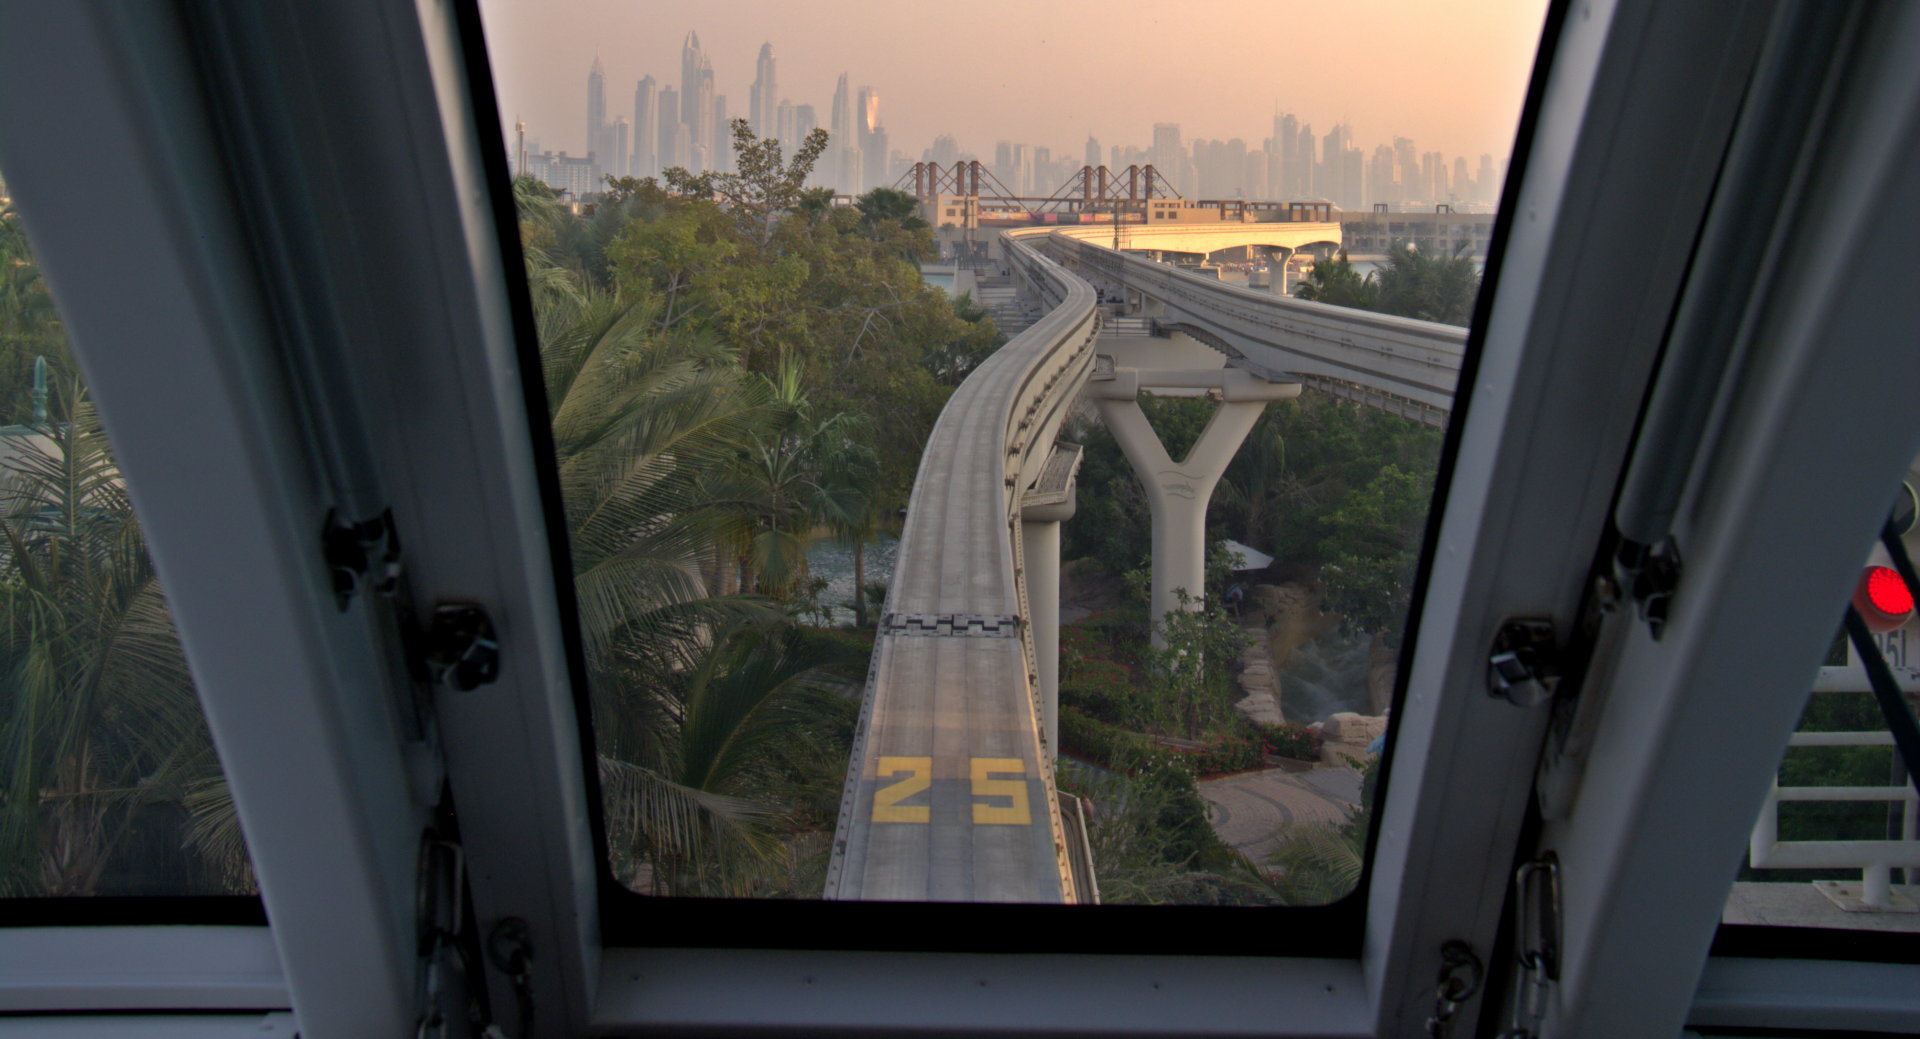
View from the Monorail on The Palm Jumeirah (open in large).
I leave The Palm, find a city e-bike and get back to the harbour. After 90 minutes cycling without a break, I check the map. This city is huge and I am nowhere close to the harbour. On the way to bring the bike back to a rental station, I discover the Dubai Canal and the newly constructed canalfront promenade and bridges. Though I am quite exhausted, I spend another hour to make photos. Eventually, I get a taxi that brings me back to the harbour. At midnight, the ship leaves Dubai for the next stop in Abu Dhabi.
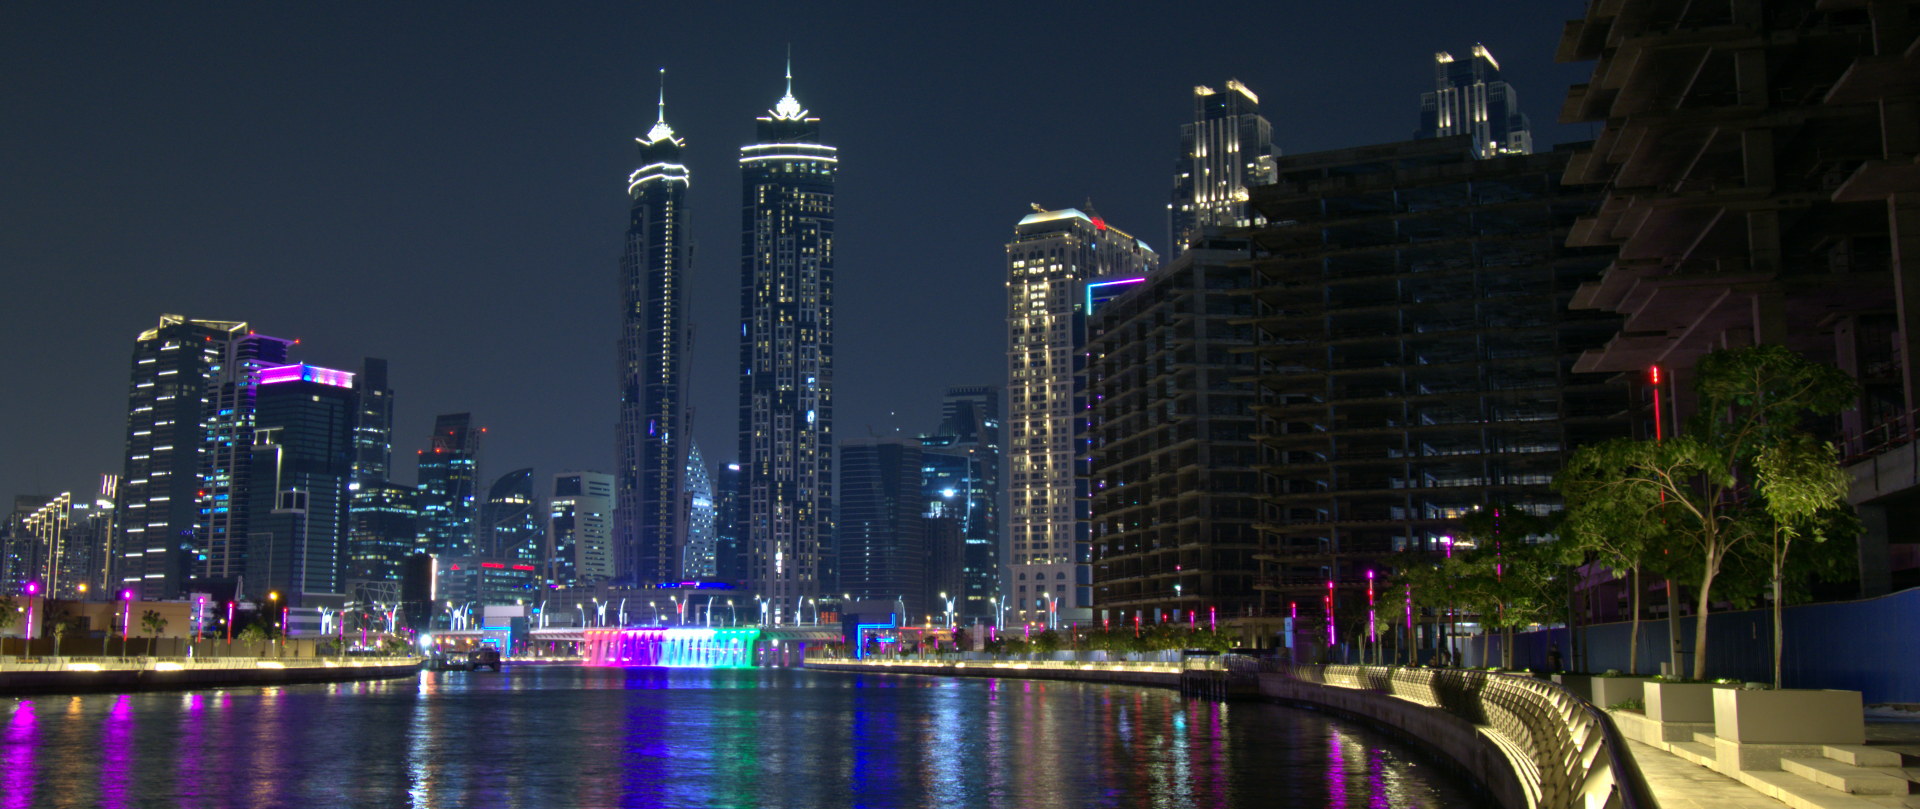
View from the Dubai Canal (open in large).
-
For the curious: I got the Nikon AF-P DX Nikkor 10-22mm f/4.5-5.6G VR. Basically all subsequent photos are shot with either that lens on a Nikon D7100 body or with my Oneplus 7 Pro phone. ↩︎
Novedades de Elisa para KDE Gear 21.12
Como estoy comentando estos días estamos ante un nuevo lanzamiento masivo de actualizaciones de las aplicaciones KDE, en esta ocasión previas a las fiestas de final de año, con el que los desarrolladores de la Comunidad KDE siguen mostrando al mundo que tienen claro que su objetivo es ofrecer los mejor del Software Libre para todos de forma continua, constante y sin cambios revolucionarios. Y como siempre voy a dedicar algunos artículos a repasar las buenas nuevas, así que hoy toca hablar de las novedades de Elisa para KDE Gear 21.12, siguiendo la estela de las novedades de Dolphin, de Spectacle, Kdenlive y Konsole de días anteriores.
Novedades de Elisa para KDE Gear 21.12

Para quienes no lo conozcan, Elisa es un reproductor de música desarrollado por la Comunidad KDE que se basa en la simplicidad y facilidad de uso. Su nacimiento fue la respuesta a la necesidad de crear un producto flexible para afrontar los diferentes entornos de trabajo y casos de uso por parte de los usuarios. Su desarrollo es lento pero seguro, afianzándose versión a versión en el ecosistema de aplicaciones KDE y mostrando una imagen moderna, clara y funcional.
Y, como no puede ser de otra manera, Elisa no para de mejorar gracias al trabajo constante de los desarrolladores de la Comunidad KDE. De esta forma en este KDE Gear 21.12 esta aplicación nos ofrece casi 100 mejoras, algunas de las cuales son las siguientes (extraídas del changelog):
- Retoques de la interfaz y opciones más optimizadas que no interfieren en su forma de rocanrolear. Elisa sigue ganando en elegancia.
- Mejoras en el texto de MediaPlayListView.
- Unificado el aspecto de las cabeceras, concretamente entre la página «Now Playing» y otras páginas.
- Se ha hecho que las calificaciones de las pistas sean editables en línea.
Además, se han corregido decenas de bugs. Esto marcha, ¿llegará a reemplazar Amarok en mi corazón? Está en ello.
Más información: KDE Gear 21.12
FreeBSD jails made simple using BastilleBSD
I wish I had BastilleBSD twenty years ago. I had a part-time sysadmin job - running web servers. PHP started to become popular by the turn of the century. Using jails on FreeBSD seemed to be a safe environment to run PHP-enabled web servers. However, there were no tools yet to work with jails. I had to write many scripts to build and update jails.
A bit of history
At first, I had a single server. Adding a new client every other month by hand was not a big overhead. However, after a year or so, the service became popular. First, I automated adding new users, then creating jails, migrating jails between servers. Later, the service gained central management, an LDAP and Windows-based management application, and almost everything was automated. At its peak, my system served tens of thousands of domains.
Of course, my scripts were not so universally useful as BastilleBSD. They were single purpose: creating FreeBSD jails with various PHP versions. Later some extra utilities were added, like ImageMagick, used by many popular PHP applications. As disk space was a premium, these scripts made sure that only the absolutely necessary files stayed in the jails. Removing all shells and apps with extra privileges also helped in reducing the attack surface. The way how my jails were created also meant that package management was not an option. The jails could not be updated. Any security update meant compiling a new base system and new ports.
Why BastilleBSD?
BastilleBSD logo
BastilleBSD has a very different approach to jails. Of course, not all functionalities of my scripts are covered, for example migrating jails between hosts is missing. However, they are more generic and make it easy to maintain jails.
Compiling an updated jail and updating jails was a painful process even with my scripts. With BastilleBSD, updating the base system without touching any of the ports is easy:
bastille update 13.0-RELEASE
And it is updated with the latest security updates in all jails utilizing this base system.
I spent a lot of time removing files from jails. This way I could spare hundreds of megabytes for each jail. BastilleBSD solves this problem in a different way: the base system is installed only once and mounted under each jail in read-only mode. This saves even more space and makes the system even more tamper-proof.
To add an application to a jail, I had to compile everything from scratch. Once everything was installed, the scripts removed much of the files. BastilleBSD has full package management within jails. If a user needs an extra app, it can easily be installed. And all ports in a jail can be updated easily, almost the same way as on the host:
bastille pkg alcatraz update
bastille pkg alcatraz upgrade
What’s more, BastilleBSD has a template system. Instead of installing all applications by hand from ports, templates can automate the process. It’s a bit like Dockerfile on Linux, but there is no central registry to store images. You can download the templates using git and apply the template to a jail locally.
bastille template alcatraz BastilleBSD-Templates/syslog-ng
I do not want to list here all BastilleBSD advantages, so here are just some highlights: it can configure PF firewall rules, use ZFS, and there is even some experimental support for Linux-based jails.
What is next?
If you want to learn more about BastilleBSD, check their website: https://bastillebsd.org/. For a very simplified introduction, you can also read my blog, where I use the syslog-ng template of BastilleBSD to setup a couple of syslog-ng servers: https://www.syslog-ng.com/community/b/blog/posts/running-syslog-ng-in-bastille-revisited

Le navigateur Brave pour protéger notre vie privée
De nos jours, nous avons souhaitons que l’on respecte notre vie privée surtout en naviguant sur le www. Le navigateur Web Brave fait justement cela tout en bloquant pratiquement toute publicité sur Internet. Brave paie pour chaque site Web que vous visitez pour l’affichage de publicités. Si le blocage des annonces ne vous dérange pas, …
Le navigateur Brave pour protéger notre vie privéeRead More »
The post Le navigateur Brave pour protéger notre vie privée appeared first on Cybersécurité, Linux et Open Source à leur plus haut niveau | Network Users Institute | Rouen - Normandie.